
Widgetizing your Blog is the new thing to explore here on Beautiful Beta. Ramani shows how to add random Einstein quotes to your Blog. Phydeaux3 started all this showing Flickr Puppies, and even Hoctro
now shows a Flickr Zeitgeist widget. So it is time that Beautiful Beta
follows these fellows, with a useful Weather Forecast Widget. And
ofcourse a tutorial on how to create this widget on your own Blog and
make it easy-to-install for your readers.
You have to follow 3 easy steps:
Step 1: Create the Widget
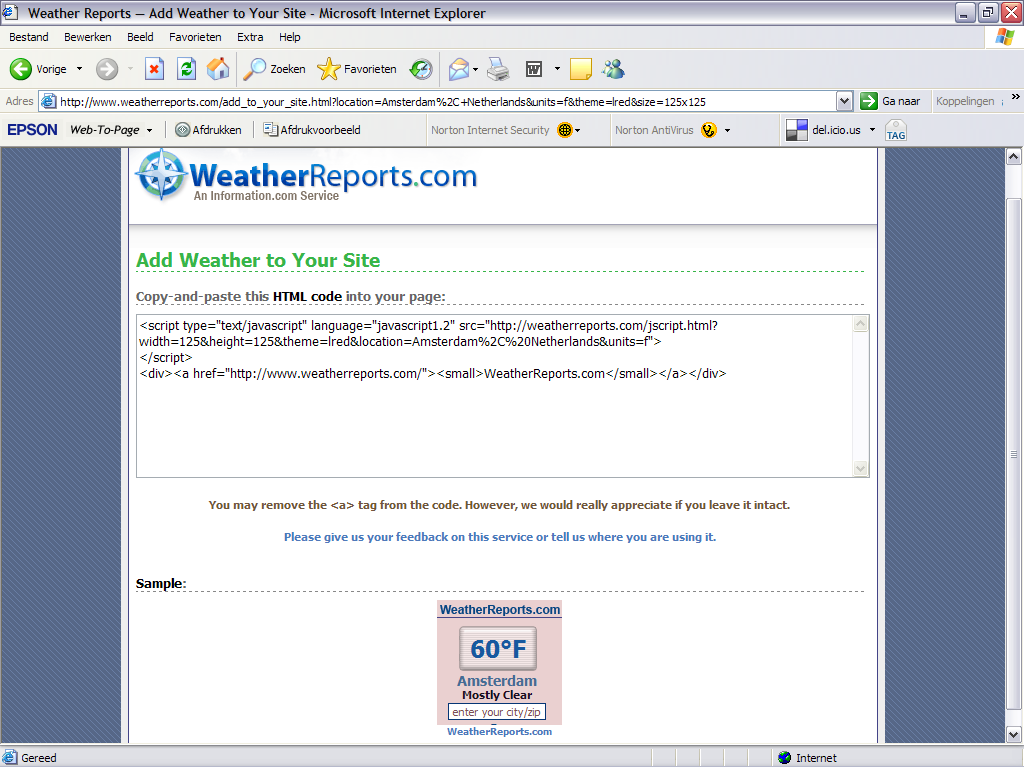
Go to WeatherReports.com, scroll down and click Add WeatherReports To Your Site.
In
the next screen, enter your city, select the colors and style of the
weatherbox. After entering all your selections, you will go to the next
screen automatically. Take a look at the preview, and select and copy
the HTML-code.

Step 2: Add the Widget to your Blog
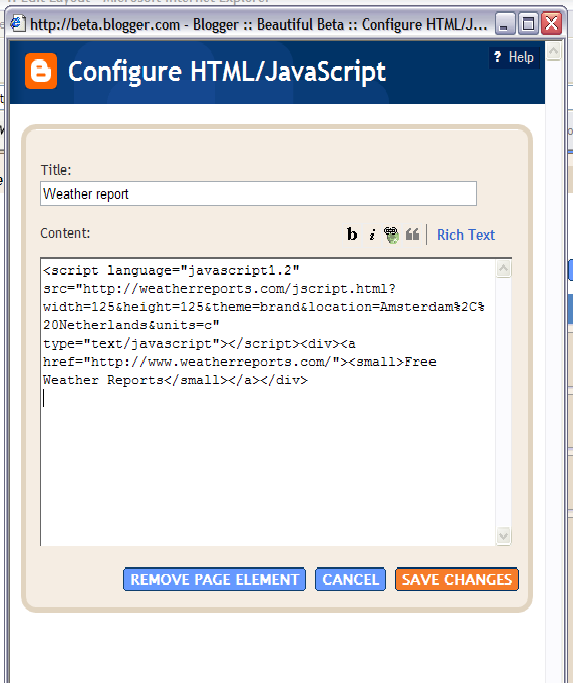
Add
an new HTML page element to the sidebar of your Blog. Paste the code
that you copied into the page element, and set its title to "Weather
Report".

Don't save it yet, but go to step 3.
Step 3: Add an Install-button
Now
we are going to add a button, that installs the widget on your visitors
blog when it is clicked. In fact, we'll add a form with several input
fields, but only the button will be visible. Here we go.
<form action="http://beta.blogger.com/add-widget" method="post">
<input value="Weather Report" name="widget.title" type="hidden"/>
<textarea style="display:none;" name="widget.content">
<script
type="text/javascript" language="javascript1.2"
src="http://weatherreports.com/jscript.html?width=125&height=125&theme=brand&location=Amsterdam%2C%20Netherlands&units=c"></script><div><a
href="http://www.weatherreports.com/"><small>Free
Weather Reports</small></a></div>
</textarea>
<input value="Install to Blog" name="go" type="submit"/>
</form>
The
text between the <textarea>-tags is the html of your widget.
Please notice that each < is replaced with <, and that each
> is replaced with >.
Now save the page element and view your Blog.
For an example look here.
If you want more information on how to add third-party widgets to your blog, take a look at these help pages.
now shows a Flickr Zeitgeist widget. So it is time that Beautiful Beta
follows these fellows, with a useful Weather Forecast Widget. And
ofcourse a tutorial on how to create this widget on your own Blog and
make it easy-to-install for your readers.
You have to follow 3 easy steps:
- Create the widget
- Add it to your Blog
- Add an Install-button to your Blog
Step 1: Create the Widget
Go to WeatherReports.com, scroll down and click Add WeatherReports To Your Site.
In
the next screen, enter your city, select the colors and style of the
weatherbox. After entering all your selections, you will go to the next
screen automatically. Take a look at the preview, and select and copy
the HTML-code.
Step 2: Add the Widget to your Blog
Add
an new HTML page element to the sidebar of your Blog. Paste the code
that you copied into the page element, and set its title to "Weather
Report".
Don't save it yet, but go to step 3.
Step 3: Add an Install-button
Now
we are going to add a button, that installs the widget on your visitors
blog when it is clicked. In fact, we'll add a form with several input
fields, but only the button will be visible. Here we go.
<form action="http://beta.blogger.com/add-widget" method="post">
<input value="Weather Report" name="widget.title" type="hidden"/>
<textarea style="display:none;" name="widget.content">
<script
type="text/javascript" language="javascript1.2"
src="http://weatherreports.com/jscript.html?width=125&height=125&theme=brand&location=Amsterdam%2C%20Netherlands&units=c"></script><div><a
href="http://www.weatherreports.com/"><small>Free
Weather Reports</small></a></div>
</textarea>
<input value="Install to Blog" name="go" type="submit"/>
</form>
The
text between the <textarea>-tags is the html of your widget.
Please notice that each < is replaced with <, and that each
> is replaced with >.
Now save the page element and view your Blog.
For an example look here.
If you want more information on how to add third-party widgets to your blog, take a look at these help pages.