Set your Photo as Background Image of Blog

How to use your Photo for the Blog Background?

Requirement
  1. You should be using a Template Designed using the Blogger Template Designer
The Background may not look good on all of the Templates in the Template Designer
Steps
1.Login to your Blogger in Draft Dashboard at http://draft.blogger .com
2. Go to the Design Link  and Click on the Template Designer
image
3. Click on Background Image under the Background Tab
image
3. In the Overlay Window you can upload your own Image
image
4. Once the upload completes, click on the uploaded image and you will be able to see a live previewimage
5. Click Done and Apply these Changes to the blog.
image


READ MORE - Set your Photo as Background Image of Blog

Niche Idea?

So... What is a Niche?

The easiest way to describe a niche is that it is a topic that you can build your website around. For example, someone might have a website about 'Food', which is a very broad topic. This might be a popular topic, but is going to have a LOT of competition, often so much so that unless they have a massive advertising budget, they will never get more than a few interested visitors a year.

If this person was to focus on a particular type of food, say... 'Chocolate Ice-cream Recipes' they can make their site the foremost authority on chocolate ice-cream recipes, with much less effort than it would to get recognized for a generic 'food' website.
READ MORE - Niche Idea?

Create a simple ajax rss widget with jquery

A medium to advanced user's tutorial for using Jquery to display a set of RSS headlines as links in a widget on your page. There are code samples on this page, however if you want to follow along easier, here is the complete final file (it's all in one HTML file for ease of use - obviously you'll want to separate your JS and CSS out into external files..)
So, suppose you want to embed the headlines from an RSS feed into your site. Assuming you're not so fussed about SEO, but rather are looking for a useful piece of content for your users, you can use Jquery and Yahoo Pipes to easily embed the headlines (and summaries if you like) into your page.
Step 1: Create a Yahoo Pipe for the RSS feed (or feeds) that you want to include.
You need a Yahoo account to use pipes, so if you don't have one, you'll need to get one. Once you have it, just log into the pipes site here: http://pipes.yahoo.com
You want to choose, Sources > Fetch Feed - this will add a Fetch Feed box into your pipe editor, now link this with the Pipe Output. That's it (Pipes are extremely powerful, however this i all we need for this particular example). Here's how the final pipe looks:
Save the Pipe. Go "Back to My Pipes" and get the URL for the new pipe as JSON.
Mine pipe URL is: http://pipes.yahoo.com/pipes/pipe.run?_id=b5c348713f1c84193acf3723d4d148a9&am...
Now that you have the JSON url, we can use jquery to render these results into a useful widget on our page.
Firstly, we need to make sure that Jquery is being included on our page. I do this using the google hosted solution, so basically it is loaded from google's servers (and cached). So, in the head of your page (if jquery isn't already there) we add this:
<script type="text/javascript" src="http://ajax.googleapis.com/ajax/libs/jquery/1.3.2/jquery.min.js"></script>
Step 2: Set up our markup and CSS
Now we create the necessary markup to hold our results. Where you want the widget to appear, we append this:
<div id="rssdata">        <ul class="rss-items"></ul>        <div class="loading">Loading RSS items...</div></div>
Obviously you can use whatever ids and classes you like, just remember to change the javascript and CSS that follows so Jquery can find the right elements.
Basic CSS styles:
#rssdata ul.rss-items{        display: none;        margin: 0;        padding: 0;}#rssdata ul.rss-items li{        display: block;        margin: 0;        padding: 0;}#rssdata ul.rss-items a{        margin: 0;        padding: 0;        display: block;        padding: 2px 6px;        background: #ccc;        color: #333;        text-decoration: none;        border-bottom: 1px solid #eee;}#rssdata ul.rss-items a:hover{        background: #666;        color: #fff;        text-decoration: none;}
Step 3: Building the Widget using Jquery..
Now, we need to make our progressively enhanced Jquery:
$('#rssdata').ready(function(){        var pipe_url = 'http://pipes.yahoo.com/pipes/pipe.run?_id=b5c348713f1c84193acf3723d4d148a9&_render=json&_callback=?';        $.getJSON(pipe_url,function(data)        {                $(data.value.items).each(function(index,item)                {                        var item_html = '<li>'+item.title+'</li>';                        $('#rssdata ul.rss-items').append(item_html);                });                $('#rssdata div.loading').fadeOut();                $('#rssdata ul.rss-items').slideDown();        });});

So, in english, we add a ready function to the #rssdata div, it holds the JSON url from our pipe above, with &_callback=? added on the end (this allows cross domain JSONP requests).
And then the ready function simply using jquery's getJSON method to load the results of our pipe and turn them into HTML elements that we then append into our UL.
Once the loaded data has all been appended, we use fadeOut to hide our Loading message and then slideDown to make our UL slide into view nicely.
If you need more help, here's a single HTML page that has all the code in the tutorial in it, for easy use (you can also use this to preview the effect).
READ MORE - Create a simple ajax rss widget with jquery

(Another) Adding Adsense Code in Template tutorial

I am sure, there are many who know this trick. But recently, I was contacted by at least dozen of people asking How to add Adsense Code to Blogger. So, Here is brief guide abut adding your Google Adsense Ad code to Blogger Template. This Post will teach you how to add the code, how to show your ads at particular place such as Ads below the post, in the post, before the post, etc.
Modify Your Code before adding to your Blogger template
Let me clarify this point. This Method will only work for New or Beta Blogger templates. For Old Blogger, Amit has very interesting and informative article on how to insert Adsense in Old Blogger template.
Blogger Template is XML template. So some of the characters such as <-- or !--> are not allowed in Blogger Template. So you will have to modify a bit in order to work in Blogger template.
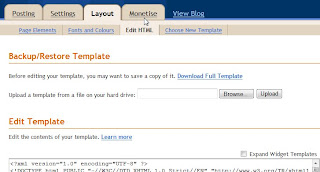
Caution: Before doing any experiments with your template, I suggest you to Download your template first and keep a good backup copy of your template.
Method 1 : Modify Blogger Template Manually
Generate your Adsense Code and now paste it in any word editor. I prefer WordPad. Now find the code <!-- and replace this code with &lt;!-- . And find another code //--> and replace this code with //--&gt;
All done!
Method 2 : Use HTML parser to do this job
Use automated parser to parse your code. Just use HTML parser from BlogCrowds.
Is Modifying Code Legal
Yeah, Google has responded at least hundred times. Read the clear Google Adsense Support Response.
Here We Go!
Now you must be ready for the Special Modified code for Blogger templates. Now, I will tell you how to insert the ads at various locations. Following guide includes how to insert Google ads After the Post, Before the Post, Just after the Title of the Post, How to show ads on main page only, how to show ads on Post pages or Label pages only.
  • Show Adsense after the Post

Just open you download template in WordPad and find the following code
<p><data:post.body/></p>
Now insert your code just after <data:post.body/>. So you Adsense code will look like this.
<p><data:post.body/>Modified Adsense Code Here</p>
  • Show Adsense before the Post

Find this code in your template. If you are using my first hack then you have already found it.
<p><data:post.body/></p>
Now insert the code just before <data:post.body/>. Now you code will look like this.
<p>Modified Adsense Code Here<data:post.body/></p>
  • Show Adsense Ads just after the Title of the Post

Just find the code. <div class='post-header-line-1'/> . Add the code below this line.
  • Show Ads in Post Footer

Just find the code. <div class='post-footer'> Add the code above this line.

<div class='post-body'>
<p><data:post.body/></p>
<div style='clear: both;'/> <!-- clear for photos floats -->
</div>
<div>Modified Code Here</div>
<div class='post-footer'>

  • Show Ads after Author Name (Credits)

Just find the code. <p class='post-footer-line post-footer-line-3'/> add the code just below it.

<p class='post-footer-line post-footer-line-3'/>
<div>Modified code Here</div>
</div>
</div>
</b:includable>
</b:widget>
</b:section>

So, I normally use these places to show my ads. Remember try to change your ad placement once in 15 days. It will try to reduce Ad blindness. Further you can use some Adsense Optimization tips to increase your Adsense revenue.
Adsense Optimization
If your posting rate is good, then Google will not be able to serve you exact contextual ads on Homepage. So it's better to show your ads on Post pages only. Note that following method only work if you are using HTML/Java box from Add a page element option. Learn How to Show ads on Post pages, Home Page Only, On Particular Page Only.
Wrap Your Ads To increase CTR
Wrapping Ads is very good practice for increasing your revenue. You can also wrap your ads. Just add the simple code above and below your Modified Adsense code.
  • To Wrap the ads to Right : Add the code as shown below.


<div style="float: Right;">
You Modified Adsense Code Here
</div>

  • To Wrap the ads to Left : Add the code as shown below.


<div style="float: Left;">
You Modified Adsense Code Here
</div>
READ MORE - (Another) Adding Adsense Code in Template tutorial

How To Submit Blogger Sitemap successfully to Google

Yeah, it’s true that this issue has been discussed many times. But traditional way of submitting RSS or Atom feed won’t help you, because it’s not a Sitemap but just a feed XML page. So in order to acts it as a Sitemap, you will have to do some minor modifications in your Blog settings. If you know how to add your Blog to Google Webmasters Tool and submit your RSS feed page then just quickly skip to end and make necessary changes in your Blog settings.
For newbies, I have tried to write and simple guide to add your Website to Google And successfully submit Sitemap. Still, if you are not able to understand any step, ask for help.
  1. Go to Google Webmasters Tool and login with exiting gmail account.
  2. Now add your Blog URL as shown below.


(Note: Your Blog URL should be http://yourblogname.blogspot.com and not as http://www.yourblogname.blogpsot.com . This is because Blogger seems to be more comfortable with first type. Hence in your Feeds, your post url are of first type.)

  1. Now you will have to verify your site. It’s very easy. Just choose verification by meta tags.
  2. Now you will be provided with unique Meta tag. Copy Meta tag.
  3. Now, login to your Blogger account. Then navigate to your Blog Layout-->HTML

Now, just try to find section in your Blog template. Add the meta tag, below <head> section.
  1. Now, go back to Google Webmaster page and click on Verify.
  2. Now you will be redirected to such a page.


Now click on add Sitemap. Then click on add general Sitemap. Now, add your Blog-Feed url as shown below.

http://yourblogname.blogspot.com/rss.xml
  1. Now click on Add Web Sitemap.

Settings For Bloggers
Now real task starts. As Blogger acts as differently with feed url, you must set your Blog as follows.
  1. Now on the same page navigate to Choose Preferred Domain under Diagnostic section.

Now you must click to select the following option.


Now, go back to Blogger Dashboard. Now navigate your Blog Settings-->Feeds. Now select Allow Full Feed option.
Now take a rest. And observe your pages getting indexed in just one week. Also share your Blog traffic experience with me. Tell me how much pages you have got indexed till now.
READ MORE - How To Submit Blogger Sitemap successfully to Google

Displaying Google Ads Below Post Titles

Displaying your AdSense ads directly under the title of your blog posts, if you use the blogger platform, could increase the exposure of your AdSense ads.

The fact that AdSense ads placed in the hot spots on a web page get the greatest exposure to visitors should not be new to you.

So how can you display your AdSense ads just under the title of your blog post?


  • AdSense CodeLog in to your AdSense account and generate the HTML code for the AdSense format you want to display under your blog post title
  • Encode AdSense Code.
    If you paste the AdSense code directly into the HTML code of you blogger template, you will get an error message and your AdSense ads will not display properly

    Why? Because blogger is in XML and the XML code needs the HTML code characters like <, > and & to be converted to entities for the code to be interpreted.

    To convert your AdSense HTML code to a format that will display properly on Blogger you need to use an HTML encoder. There are several available to use online, just perform a search engine query
  • Log in to your blogger account
  • In the dashboard click on the 'layout' tab

  • Once the layout has loaded, click on the 'Edit HTML' tab in the navigation
  • Back up your current template.


This is very important. You are about to edit the template of your blog and if you make a significant mistake you want your blog template available to reload
  • Click on the 'Expand Widget Templates' radio button and look for the following code

  • Paste your encoded AdSense code just beneath the code displayed above

  • You can preview your results before saving the new template
  • It really is that easy

READ MORE - Displaying Google Ads Below Post Titles

Showing Codes in Blogger Posts Properly, a Basic Guide

HTML and Javascript codes perform different functions for our blog posts, such as changing the appearance of text like this. But when we need to display the actual code used to perform these functions, we can't simply paste this code into a post as it will perform the function, and not display as regular text.
As you may have seen in my other posts, I use two different methods to display code as text which can be read, copied and pasted for your own use. These are blockquotes and iframes. In this post I'll explain how you can use these methods to display readable code in your own blog posts.
The problem when trying to paste code into your posts is that it will perform the intended function, rather than display as regular text. For example, if I wanted to explain how to make text italic, I could try adding this into my post:
<i>This is italic text</i>
But if I simply paste this code into a post, the effect will be this:
This is italic text
This is because the code is performing the function of the code I pasted, rather than displaying as readable text.
To display this code as text, we need to use "character entities instead.

What are "character entities"?

You could say that HTML uses a special language, and that we need to say things in a different way for a web browser to understand it. Character entities make the browser understand that we want to display a certain character, rather than use the function of this character.
Character entities are made up of three parts:
  1. An "ampersand" (the & symbol)
  2. Either a descriptive phrase, or a # followed by a number
  3. A semicolon (the ; symbol)
Here is an example of the character entity for the © (copyright) symbol:
&copy;
This example uses the descriptive phrase "copy", though it could also be used with the # and it's number instead:
&#169;
Either of these methods will have the effect of reproducing the © symbol in your blog post (or in any web page for that matter!).

The most common character entities you will need to use

Here are the most common characters and their equivilent character entities you would need to use to display code in your posts:

Result Description Entity Name Entity Number
< less than &lt; &#60;
> greater than &gt; &#62;
& ampersand &amp; &#38;
" quotation mark &quot; &#34;
For a complete list of character entities, take a look at the reference page provided by W3 Schools.

Using the character entities

In the code you would like to display, you will need to substitute each of the HTML characters above with the equivalent character entity. For example:
<i>This is how to display italic text</i>
Should be written instead as
&lt;i&gt;This is how to display italic text&lt;/i&gt;
This is more commonly known as "escaping" the HTML code.
You could write these character entities by hand each time you need to display code in your blog posts. However, I find it easier to use the "replace" function in Notepad to replace each instance of a certain character with the equivalent character entity. Alternatively, you could use the free HTML code parser tool provided by BlogCrowds which can substitute all necessary characters for you in one click!

Displaying the "escaped" code in your blog posts

As I mentioned right at the beginning of this post, I use two different methods to display code in my posts: blockquotes and Iframes (inline frames).

Blockquotes

Blockquotes are useful if you only need to display a small section of code. Usually, your blog template will indent any content which is enclosed in <blockquote> tags; sometimes styling will also be used, such as a different colored background or border.
To display your code as a blockquote, you will need to use the following format:
<blockquote> Your content/"escaped" HTML code goes here </blockquote>

Iframes

Iframes (inline frames) are more useful to display long sections of code, such as the template codes displayed in the Templates section of this blog. They are used to display the content of an external file in the body of a page, and can be used to display a large amount of content in a small amount of space. If the dimensions of the iframe are smaller than those of the content it contains, the iframe will have scrollbars so your readers can access the whole content.
Unfortunately iframes are slightly more difficult to create than blockquotes as the content of the iframe must be externally hosted; it is not a part of the page itself.
To create the content of an iframe, you will need to create an HTML file containing your "escaped" code. Don't worry about adding all the elements of a regular web-page, such as the head and body tags: the easiest way to create the HTML file is to paste your escaped HTML code into your favorite text editor (such as Notepad) and save this with an ".html" extension.

Once you have uploaded your HTML file to an external host, you will need to call the iframe in the body of your blog post. To do this, you can use the following format, substituting the example URL for that of your HTML file:
<iframe src="http://hosting-provider.com/your-file.html"><iframe>
You can then preview your blog post to ensure the code displays correctly within the iframe.If you prefer, you can also specify the dimensions of the iframe to ensure it doesn't stretch too far down or across the page in your post like this:
<iframe src="http://hosting-provider.com/your-file.html" width="400px" height="200px"><iframe>
READ MORE - Showing Codes in Blogger Posts Properly, a Basic Guide

Display Links in seconds with Javascript

<!DOCTYPE html PUBLIC "-//W3C//DTD HTML 4.01//EN" "http://www.w3.org/TR/html4/strict.dtd">
<html>
<head>
<script type="text/javascript" src="http://www.cpalead.com/id..."></script>
<title>Download PDF eBook</title>
<meta http-equiv="Content-Type" content="text/html; charset=iso-8859-1">
<style type="text/css">
body{
text-align:center;
}
#content{
position: absolute;
top: 35%;
width:95%;
text-align:center;
}
.counter {
font-size: 2.5em;
}
.footy{
font-size: 0.3em;
}
</style>
<script type="text/javascript">
document.write('<style type="text/css">#timed{display:none;}<\/style>')
function delay_link(){
 var d=delay_link, t=document.getElementById('timed');
 if(d.c&&d.c.nodeValue.replace(/[^\d]*/,'')-1>0){
  d.c.nodeValue='\xa0\xa0'+(d.c.nodeValue.replace(/[^\d]*/,'')-1);
  setTimeout('delay_link()', 1000)
  return;
 }
 else if(!d.c){
  d.c=document.createTextNode('5');
  t.parentNode.insertBefore(d.c,t);
  setTimeout('delay_link()', 1000)
  return;
 }
 d.c.nodeValue='';
 t.style.display='inline';
}
</script>
</head>
<body>
<div id="content">
 PDF link served in...

<div class="counter">

<div id="timed"><a class="link" href="http://blog-unity.blogspot.com/">Here</a><p class="footy"><strong>Click</strong> to open or <strong>Right Click -> Save Link As...</strong> to download pdf file, thanks :). <a href="http://www.filemount.com">Go Home</a></p></div>  
 
</div>
</div>
<script type="text/javascript">delay_link();</script>
</body>
</html>
READ MORE - Display Links in seconds with Javascript

Increase Traffic with Submitting Blog to Blog Directories

Since your blog is a new one with pagerank zero and has low traffic, you need submit your blog to blog directories which have high pageranks than your blog as a blog promotion tactic. Here are Top blog directories address which will send you maximum traffic.
Before submitting your blog many of these directories asks you to register.
READ MORE - Increase Traffic with Submitting Blog to Blog Directories

Highlight Text Area on Blogger Post

I hope the tutorials in this blog can useful for you. at this time I still have time to make some tutorial for you before going to bed. now I wanna give you the material about "How to make High Light Text Are" The highlight text area is very useful for the visitors who wanna copy the code at your blog and paste it in their blog. It will decrease the risk of failure copying the code. The example button is like at this post The step is just copy the code below to your post...just it
READ MORE - Highlight Text Area on Blogger Post

Stylish Title Blogger Post

If you have seen the post titles of this blog, you must have understood that the font is different from the other blogs. Even you can change the font of your blog easily. Check the picture below to see the font that I have used for my blog post titles.


To change the font of your blog post titles, visit the Layout of the blog template and click on Edit HTML option. Select the Expand Widget Templates option. Now search .post h3 or .post h2 , whichever is present in your template.

If .post h3 is present in the template, the code will be similar to the one shown below

.post h3 {
margin: 0 0 5px;
padding-bottom:6px;
}
.post h3 a, #content h1 a:visited {
color: #A0A2F9;
font-size: 18px;
font-family: Waltograph UI,trebuchet ms, tahoma, Verdana, Arial, Sans-Serif;
font-weight: normal;
margin: 0 0 5px;
padding: 0;
text-decoration:none;
text-align:left;
line-height:1.4em;
}

The main thing you should check is that font-family should be present in either  .post h3 or .post h3 a . Once you find font-family , just add the font that you want at the beginning just as I have added Waltograph UI in the beginning.

That's it, now click on the Preview button to check whether the font has been implemented or not.

However if .post h3 isn't present in the template, then search for .post h2 and apply the same steps as given above for .post h3

However some templates dont have the .post h2 code in the template. For that first search .post in the template and paste the following code just above it


 .post h2 {
    color: #A0A2F9;
    font-size: 28px;
    font-family: Waltograph UI,trebuchet ms, tahoma, Verdana, Arial, Sans-Serif;
    font-weight: normal;
    margin: 0 0 5px;
    padding: 0;
    text-decoration:none;
    text-align:left;
    line-height:1.4em;
}


Just replace Waltograph UI with the font that you want. You can change the code to change the size, colour and other characteristics of the post title.

Here are some examples for you

Font Name: Amelia-Normal


Font Name: File


 Font Name: PicoBlackAl


Font Name: Vanilla


If you want to download some awesome fonts, then check 20 Cool Hand Drawn Fonts . Now its up to you to decide which font you want for your blog. I hope that you found this post useful.
READ MORE - Stylish Title Blogger Post

adding twitter @anywhrere to Blogger

Last month twitter made the @anywhere live which allows you to add many great twitter features on your blog. Of them, the Hovercards feature is being widely used. In this tutorial, we will explain you how to add the twitter @anywhere Hovercard feature to your blogger blog.


First you will have to create an @Anywhere application. You will have to fill some information as show below


Fill any name you want for the Application name and Organization. For the Application Website and callback URL use your blog address. Keep the Default Access Type as Read & Write and then enter the CAPTCHA and press the Register Application button.

You will now be taken to a page where you will see the code for twitter @anywhere.


Just copy the code between <head> and </head> tags. Now go to the Layout option for your blogger blog and click on Edit HTML option, search </head> and paste the code just above it.

Now save the template and visit your blog. You can try the @anywhere feature by adding @YourUsername in the blog post or comments section. However if you are using comment tools like Intense Debate or Disqus , then the @anywhere feature wont work in the comments section.
READ MORE - adding twitter @anywhrere to Blogger

Add DISQUS Comments To Blogger Blog

DISQUS Comments Blogger

We have already shown you How To Add Intense Debate To Blogger Blog. Now in this post we will explain how to add DISQUS Comments to your blogger blog. DISQUS is a very popular blog comment system which is being used by many popular blogs like Mashable.


Adding it to your blogspot blog is simple and it won't take much time to add it to your blog. First visit DISQUS Comments and create an account and register your blog. Once you do that, you reach the Quick Setup page where you can choose the preferred language. Other options include, adding Facebook Connect, Media Attachments, Akismet, Reactions, Trackbacks.

DISQUS Comments Blogger

Once you select the options, click on the Continue button. You will see a list of blogging platforms where you can install DISQUS. Choose Blogger as your platform.

DISQUS Comments Blogger

Now you will see Installation Instructions for Blogger platform. First you have to download the Blogger template on which you want to add DISQUS. To download the template, visit the Edit HTML option in Design section of the blog. You will find the Download Full Template option on that page.

DISQUS Comments Blogger

Now you have to upload the template and decide whether you want to add DISQUS only on new posts or on all the blog posts.

DISQUS Comments Blogger

Now you will be taken to a page where in the first step you will see your template code which you will have to add to your blog. Select and copy the code given in step 1 and then go to Edit HTML option of your blogger blog. Select the Expand Widget Templates option. Now select all the code given below and replace it with the code given in Step 1.

DISQUS Comments Blogger


Once you have replaced the code, Save the template and check you blog. You will see that DISQUS has been added to your blog. In the 2nd Step you will have to import the existing comments if you have selected to add DISQUS on all blog posts. If you were using other comment systems like Intense Debate, JS-Kit on your blogger blog, then you can also import the comments. You have to download the Comments XML file from the earlier comment system and upload it to DISQUS.

That's it, now DISQUS has been installed on your Blogger blog. Hope you loved this post.
READ MORE - Add DISQUS Comments To Blogger Blog

Create Date and Day in Blogger

1.Log in to your dashboard--> layout- ->Page Elements

2.Click on 'Add a Gadget'.

3.Select 'HTML/Javascript' and add the code given below and click save.

Select HTML/JavaScript

<script type='text/javascript'>

var mydate=new Date()
var year=mydate.getYear()
if (year < 1000)
year+=1900
var day=mydate.getDay()
var month=mydate.getMonth()
var daym=mydate.getDate()
if (daym<10)
daym="0"+daym
var dayarray=new Array("Sunday","Monday","Tuesday","Wednesday","Thursday","Friday","Saturday")
var montharray=new Array("January","February","March","April","May","June","July","August","September","October","November","December")
document.write("<p>"+dayarray[day]+", "+montharray[month]+" "+daym+", "+year+"</p>")

</script>


You are done.Now you can see it as picture below.

Show Date,Month,Year on Blogger
READ MORE - Create Date and Day in Blogger

Add YouTube Style Search Button To You Blog

If you have visited YouTube , then you must have seen the the Search Box at the top of the site along with the Search button. Its a very simple looking button using hover effects to show shadow whenever you move the mouse over the Search button. This is very simple to implement on your blog for the search button and you can also use it for the Adsense Blog Search button just as I am using it on this blog. We are going to use the CSS moz-box-shadow to achieve this effect.


Adding this is very simple thing. If you already have a search box on your blog then check its code and if you don't have it you can use the Google Adsense search box. All you have to do is find the part of the code where you will get type="submit" . In that part you will have to change the value of value as shown: value="sbutton" . This is how it should appear.


<input class="sbutton" value="Search" name="sa" type="submit" />
Once you have done that, you will have to add its CSS part to make it work. If the code of the search box is present in the template, then you will have to add the CSS part of the code in the CSS section. But if you are using the Search box as a widget, then you will add it in the widget itself, considering its a HTML/JavaScript widget.

Here's the CSS part. Remove the <style> and </style> part of the code if you are pasting it in the CSS section.

<style>
.sbutton{
background:#F4F4F4;
width:70px;
height:25px;
border:none;
-webkit-transition:  -webkit-transform .15s linear;
-webkit-box-shadow: 0 0 4px rgba(0,0,0,.25);
-moz-box-shadow: 0 0 4px rgba(0,0,0,.25);
-moz-border-radius-bottomleft:4px;
-moz-border-radius-bottomright:4px;
-moz-border-radius-topleft:4px;
-moz-border-radius-topright:4px;
border:1px solid #CCCCCC;
}

.sbutton:hover {
-webkit-box-shadow:  0 0 4px rgba(0,0,0,.5);
-moz-box-shadow: 0 0 4px rgba(0,0,0,.5);
}
</style>
That's it, now you have added the YouTube style search button to your blog. If you are facing any problem, then do tell us. Hope you enjoyed the post.
READ MORE - Add YouTube Style Search Button To You Blog

Add Mashable Style Social Media to Blogger

You must have seen the Social Media widget that was used by Mashable for a certain period of time. This widget looks attractive and has nice effect to it, which makes it appealing to the eyes.This is great as you can get many visitors to your social media profile from them and is a great way to increase your contacts on other networks with the help of your blog. If you havent seen the widget before, then check the image below to get an idea.


Mashable Social Media Widget

It is very easy to add this widget to your blog, be it a Blogger(Blogspot) blog or a Wordpress or belonging to some other platform. However, as this blog is for blogger platform, we will explain how to add this Social Media widget to your Blogger blog.

To add it to your blog, visit the Design section of your blog and in the Page Elements section, click on Add a Gadget. In it, choose the HTML/Javascript option and paste the following code in it.


<style>
/* subscribe widget */
#subscribe1 { background:#f3f3f3; height:60px;width:288px; margin:0px 0px 15px 0px; padding:8px 5px; border:1px solid #e6e6e6; border-bottom:1px solid #e6e6e6; font-size:90%; }
.subscribe_icons { width:286px; margin:0px auto; }
.subscribe_icons li { display:inline; float:left; margin:0px 2px 5px 2px; width:52px; text-align:center; font-size:11px; }
.subscribe_icons a { display:block; padding:40px 0px 2px; -webkit-transition:all .2s ease-out; -moz-transition:all .2s ease-out; color:#444 !important; }
.subscribe_icons a:hover { color:#26b !important; text-decoration:none; -moz-box-shadow:0px 2px 4px hsla(0,0%,0%,.35); -webkit-box-shadow:0px 2px 4px hsla(0,0%,0%,.35); }
.subscribe_icons .subscribe_twitter a { background:url(http://i49.tinypic.com/2mq2es5.png) center top no-repeat; }
.subscribe_icons .subscribe_facebook a { background:url(http://i49.tinypic.com/52b7yv.png) center top no-repeat; }
.subscribe_icons .subscribe_rss a { background:url(http://i47.tinypic.com/maapvk.png) center top no-repeat; }
.subscribe_icons .subscribe_email a { background:url(http://i46.tinypic.com/2e4vgwy.png) center top no-repeat; }


</style>


<!--begin of social widget-->
        <div id='subscribe1'>
   
        <ul class='subscribe_icons'>

            <li class='subscribe_twitter'><a href='http://twitter.com/rahuljrark' rel='nofollow' target='_blank'>Twitter</a></li>

            <li class='subscribe_facebook'><a href='http://www.facebook.com/rahuljadhav' rel='nofollow' target='_blank'>Facebook</a></li>
            <li class='subscribe_rss'><a href='http://feeds2.feedburner.com/cooltricksntips' rel='nofollow' target='_blank'>RSS</a></li>
            <li class='subscribe_email'><a href='http://feedburner.google.com/fb/a/mailverify?uri=cooltricksntips&amp;loc=en_us' rel='nofollow' target='_blank'>Email</a></li>
</ul>


         <!--end .subscribe_icons--></div>


You have to change the username highlighted in red colour with your username and also the feedburner id for your blog. Now click on Save and check your blog. You should note that if your blog already uses symbols for ul and li tags, then you may face some problem with the alignment of this widget. If you are facing any problem with the placement of the widget then do tell me about it.
READ MORE - Add Mashable Style Social Media to Blogger

Adding StumbleUpon to Blogger

Like all other Social networks, StumbleUpon has also got some really elegant sharing buttons. StumbleUpon has got 6 different  sharing buttons.  You can choose any of these six. Integrating this into your blogger blog will require some template Edits.

image

How to add the Stumble Upon Counter Button  to Blogger?

1. First of all pick one of these 6 Button Styles.
2.Now Login to your Blogger Template and navigate to Design   >  Edit HTML and click on the check box which says “Expand Widget Templates”
3. Look for <data:post.body/> and immediately above it paste the following code.
<b:if cond='data:blog.pageType == "item"'>
<div style="float:right;padding:4px;">
<script expr:src='"http://www.stumbleupon.com/hostedbadge.php?s=5&amp;r=" + data:post.url'/>
</div>
</b:if>
4.Save the Template and you will see a vertical Stumbleupon counter(style 5) on your post. In the code above, you can change s=5 to s=1 or s=2 or s=3 or s=4 or s=6 to get the other button styles.
5. If you need the counter on every page, then remove the two lines of code in Green Color.
6. If you want the button to appear on the left side, then change float:right to float:left
READ MORE - Adding StumbleUpon to Blogger

Add a Recent Comment on Blogger

Blogger Widgets


In the last post Simplest Way To Add A Recent Posts Widget To Blogger Blog I explained a very easy method to add a Recent Posts Widget to Blogger blog. Using the same method, we can also create a Recent Comment Widget for blogspot users in a simple manner. Just follow the simple steps and add a Recent Comments widget to your blog.


Step 1:
Click on Layout option of the blog for which you want to add the widget.


Blogger Basics


Step 2:
Now click on Add a Gadget option.

Blogger Widgets


Step 3:
You will see a list of Gadgets. Find Feed among them and click on it.


Blogger Widgets


Step 4:
Now you will have to add your Blog Comments Feed url and click on Continue. Once you do that, you will be taken to a page where you can choose how you want to display the Recent Posts Widget. You can also choose how many comments you want to display in the widget.

If you don't know the comments feed URL of your blog, then replace the blog address with your blog address in the URL given below.
http://www.cooltricksntips.com/feeds/comments/default

Just replace www.cooltricksntips.com with www.yourblog.com or www.yourblog.blogspot.com


Recent Comments Widget


Click on Save and refresh your blog, you will see the Recent Comments Widget on your blog
READ MORE - Add a Recent Comment on Blogger

Add Related Posts To Blogger Blog With LinkWithin

LinkWithin Related posts


You must have seen many blogs which provide tutorials to add Related Posts below the Blogger blog posts. These widgets are very useful, however it involves adding lots of code to your blogger template which may be difficult for some people. However, LinkWithin  has provided a simple and wonderful way to add related posts to a blogger blog. This method is very useful for those blogspot users who dont know much about coding and also for the other users.

To add the related posts widget, visit LinkWithin . There you will see a box on the right side which asks you to fill information about your blog. Just fill the information and click on Get Widget


LinkWithin Related posts


Then you will reach a page which has information about adding the widget to your blog. Click on the Install Widget button given in the 1st point.Then you will be taken to Add Page Element page. Select the blog for which you want to add the widget and press ADD WIDGET

LinkWithin Related posts


Now that the widget has been added to your blog, it will be better if you place it just below the Blog Posts widget

LinkWithin Related posts


Now click on Save and the widget has been added to your blog. However, there might be a possibility that the widget may not work on your blog template. In that case use the support provided by LinkWithin. Just fill the form telling the problem that you are facing. When you contact them for help make sure that the widget is present on your blog. Only then your problem will be solved by them in 1-2 days

LinkWithin Related posts
READ MORE - Add Related Posts To Blogger Blog With LinkWithin

How to Make Dofollow at Blogspot

in this post I will share you about how to make your blog become dofollow. If you want other people to comment on your blog, you have to give them something in return. A link with no nofollow is a good way of saying thank you for a comment. bloggers are frequently complaining that nobody would comment on their blogs. In fact, you see that some blogs attract loads of comments and become a fun place to be while others seem so empty like an old bucket. So what is the difference? DoFollow!
Besides, once you go DoFollow, your blog will soon be included in different dofollow blog directories and lists. So it is a good way to get extra traffic and popularity.
Actually there is no such thing like DoFollow yet there is a URL attribute “nofollow”. The steps to make your blog become dofollow blog are: 1. Go to your blogger dashboard > Layout > Edit HTML 2. Click column Expand widget Template, scroll down the template code and find this code
3. replace that code with this code
4. Save your template
Please see the picture for more detail
before
after
please leave the comment if you have any question
READ MORE - How to Make Dofollow at Blogspot