Showing posts with label comment. Show all posts

Google integrates Google+ comments from Blogger

+ blogger 

A new option in Blogger.com allows for enhanced integration of Google+ into the Blogger service from Google. Thus, it is now possible that comments from Google+ appear on Blogger and vice versa. But first you have to link his blog with Google+.

With the new integration now also comments that are made on Google+ appear on the blog. Logically, this also happens the other way around.

Fountain-screenshot-EN

"Your blog readers now have the opportunity to publish their comments for all or only for their circles on Google+. When reading the readers can also specify whether you only the newest or just want to see people from their circles all comments. 
general rule is that you and your readers can each see only the comments that have received authorization. This not only a more targeted sharing content and comments allows but also potentially generate more traffic to your blog, "writes Google.

The function can be activated in Google+ on the blogger dashboard. Just look at it, you can see for example in Blogger Buzz . It remains to be seen when and if Google will offer this feature for other website.

READ MORE - Google integrates Google+ comments from Blogger

adding twitter @anywhrere to Blogger

Last month twitter made the @anywhere live which allows you to add many great twitter features on your blog. Of them, the Hovercards feature is being widely used. In this tutorial, we will explain you how to add the twitter @anywhere Hovercard feature to your blogger blog.


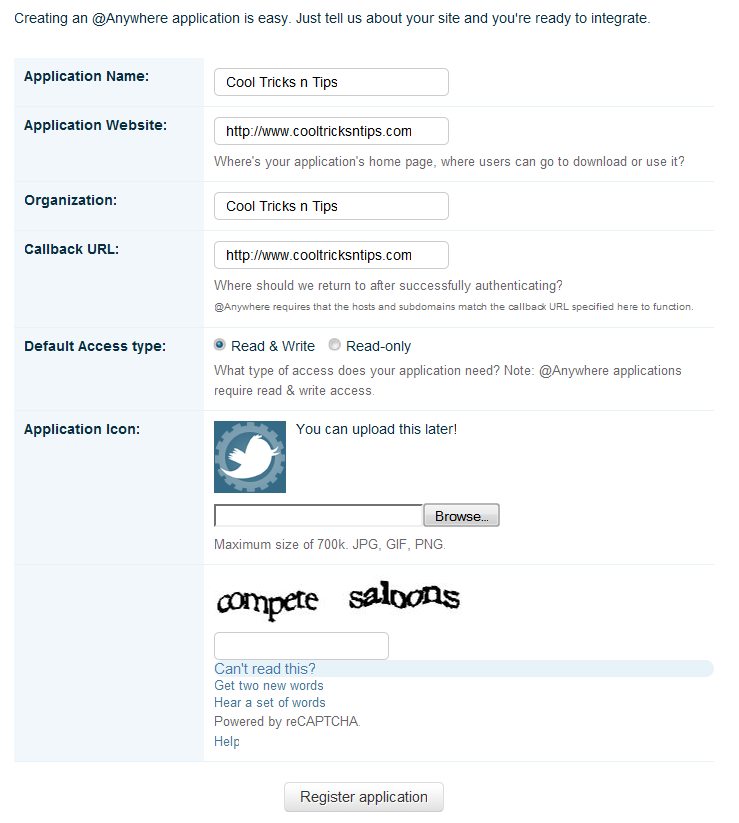
First you will have to create an @Anywhere application. You will have to fill some information as show below


Fill any name you want for the Application name and Organization. For the Application Website and callback URL use your blog address. Keep the Default Access Type as Read & Write and then enter the CAPTCHA and press the Register Application button.

You will now be taken to a page where you will see the code for twitter @anywhere.


Just copy the code between <head> and </head> tags. Now go to the Layout option for your blogger blog and click on Edit HTML option, search </head> and paste the code just above it.

Now save the template and visit your blog. You can try the @anywhere feature by adding @YourUsername in the blog post or comments section. However if you are using comment tools like Intense Debate or Disqus , then the @anywhere feature wont work in the comments section.
READ MORE - adding twitter @anywhrere to Blogger

Add DISQUS Comments To Blogger Blog

DISQUS Comments Blogger

We have already shown you How To Add Intense Debate To Blogger Blog. Now in this post we will explain how to add DISQUS Comments to your blogger blog. DISQUS is a very popular blog comment system which is being used by many popular blogs like Mashable.


Adding it to your blogspot blog is simple and it won't take much time to add it to your blog. First visit DISQUS Comments and create an account and register your blog. Once you do that, you reach the Quick Setup page where you can choose the preferred language. Other options include, adding Facebook Connect, Media Attachments, Akismet, Reactions, Trackbacks.

DISQUS Comments Blogger

Once you select the options, click on the Continue button. You will see a list of blogging platforms where you can install DISQUS. Choose Blogger as your platform.

DISQUS Comments Blogger

Now you will see Installation Instructions for Blogger platform. First you have to download the Blogger template on which you want to add DISQUS. To download the template, visit the Edit HTML option in Design section of the blog. You will find the Download Full Template option on that page.

DISQUS Comments Blogger

Now you have to upload the template and decide whether you want to add DISQUS only on new posts or on all the blog posts.

DISQUS Comments Blogger

Now you will be taken to a page where in the first step you will see your template code which you will have to add to your blog. Select and copy the code given in step 1 and then go to Edit HTML option of your blogger blog. Select the Expand Widget Templates option. Now select all the code given below and replace it with the code given in Step 1.

DISQUS Comments Blogger


Once you have replaced the code, Save the template and check you blog. You will see that DISQUS has been added to your blog. In the 2nd Step you will have to import the existing comments if you have selected to add DISQUS on all blog posts. If you were using other comment systems like Intense Debate, JS-Kit on your blogger blog, then you can also import the comments. You have to download the Comments XML file from the earlier comment system and upload it to DISQUS.

That's it, now DISQUS has been installed on your Blogger blog. Hope you loved this post.
READ MORE - Add DISQUS Comments To Blogger Blog

Add a Recent Comment on Blogger

Blogger Widgets


In the last post Simplest Way To Add A Recent Posts Widget To Blogger Blog I explained a very easy method to add a Recent Posts Widget to Blogger blog. Using the same method, we can also create a Recent Comment Widget for blogspot users in a simple manner. Just follow the simple steps and add a Recent Comments widget to your blog.


Step 1:
Click on Layout option of the blog for which you want to add the widget.


Blogger Basics


Step 2:
Now click on Add a Gadget option.

Blogger Widgets


Step 3:
You will see a list of Gadgets. Find Feed among them and click on it.


Blogger Widgets


Step 4:
Now you will have to add your Blog Comments Feed url and click on Continue. Once you do that, you will be taken to a page where you can choose how you want to display the Recent Posts Widget. You can also choose how many comments you want to display in the widget.

If you don't know the comments feed URL of your blog, then replace the blog address with your blog address in the URL given below.
http://www.cooltricksntips.com/feeds/comments/default

Just replace www.cooltricksntips.com with www.yourblog.com or www.yourblog.blogspot.com


Recent Comments Widget


Click on Save and refresh your blog, you will see the Recent Comments Widget on your blog
READ MORE - Add a Recent Comment on Blogger

Adding Intense Debate to Blogger

Blogger


If you have visited a Wordpress blog, then you must have seen the comment form which has option to fill the Name , email id and Blog address. However the Blogger blog doesnt have such a comment form. The Blogger comment system has only three types
1.

2.
3. Embedded below post

Out of the three options, the first two should be avoided as much as possible as only the blog comments are visible below the post. To comment on that post you have to visit another page. This increases the work of the blog reader and there are chances that they may not comment as they have to visit another page.


Blogger


The third option is better than the other two as it is an Inline Comment Form. But even this comment form isnt very good as there aren't many options that are available in Wordpress Comment Forms.

Blogger


We cant know the email id of the person who has commented on our blog nor can we block spam comments. Also there is no option to ban certain person from commenting on our blog.

However we can add these features on on our Blogger Blog by using Intense Debate.

Intense Debate is a commenting system which has been created by Automattic who are the creators of Wordpress. Below is the pic of the Intense Debate Comment Form on a Blogger Blog.

Blogger


Here are some of the features of Intense Debate:


1. Comment Threading : With Intense Debate Comment Threading is possible which means we can reply to comment. This is very useful as you no longer have to put your comment at the bottom of the comments even if you want to reply to the first comment.


Blogger


2. Moderation and Blacklisting : You can moderate the comments being posted on your blog and can blacklist comments by specifying certain keywords which are present in the comment by adding them to the moderation list or automatically deleting them.

3. Gravatar : With Intense Debate you will get support for enabling Gravatar in your blog. So if you have a Gravatar, then you will see your picture beside the comment.

4. Smileys : Intense Debate also provides Smilies in the comments. This makes your comments look better.

5. Add Image : Using Intense Debate, you can add an image to the comments.

6. Widgets : When you add Intense Debate to your blog , you get a variety of widgets which you can add to your blog. You can display the total number of comments made on your blog or some of the following widgets:
  • Recent Comments Widget
  • Popular Blog Post Widget
  • Top Commenters Widget
  • My Recent Comments Widget
7. Add Polls : You can also add polls in the comments if you have an account at Intense Debate

8. You Tube Videos : The Intense Debate users can also add You Tube videos to blog comments.

9. Twitter : With Intense Debate, the blog commenters have the option to send a simultaneous tweet when they post a comment.

10. Email Id : When you select the option to get email updates whenever there is a new comment, you get the email id of the person who has commented in that email.

With so many features, it is better if Blogger users start using Intense Debate instead of the boring Blogger comment form. Adding Intense Debate to your blog isnt that tough.

To add Intense Debate to your blog, you have to create an account at Intense Debate. After that you have to follow three steps.

In the First Step specify the address of the blog for which you want to add Intense Debate


Blogger


In the Second Step, you have to select the Blog Platform. We will choose Blogger.


Blogger


After clicking on Blogger comes the most important step. In Step Four you have to choose whether you want to install Intense Debate as a Widget or directly into the Template. Installing it as a Widget is easy but it can increase page load time. Choosing the Template option will reduce the load time but it is tough compared to the Widget option.

You also have to choose whether you want to install Intense Debate for all your posts or only the new posts. If you have many posts with comments then select the second option, otherwise your comments will be hidden.

If you want to save your work, then choose the Widget option to install Intense Debate. When you click on the widget option, you will see some instructions which will tell you how to add it to your blog. Jump to the 4th instruction which contains the link "Add widget to my blog". On clicking it, you will see your Blogger account on the right side. Select the blog for which you want to add Intense Debate and click on Add Widget. Thats it, and your work is over.


Blogger


But it will be better if you choose the Template option as it will reduce the page load time. Before starting this step, it is better if you backup your template. Goto Layout>Edit HTML and click on Download Full Template. When you will click on the Template option, you will see some instructions below it. . After the download is complete, read instruction no.4 . In this step you have to select the template that you have just downloaded and Upload File.


Blogger


On uploading the file, you will see a new set of instructions on the left side and your Blogger Dashboard on the right side. Jump to the 3rd instruction. You will see a box in which there is some code. Click on it to select it and copy it.


Blogger


Once you have copied the HTML code, go to Layout>Edit HTML and select Expand Widget Templates and replace the earlier template code with the one you have just copied. Now click on Save Template. Now you have finished installing Intense Debate to your blog.

I hope that you found this tutorial useful. If you are facing any problems, please comment your and I will try to help you as soon as possible
READ MORE - Adding Intense Debate to Blogger