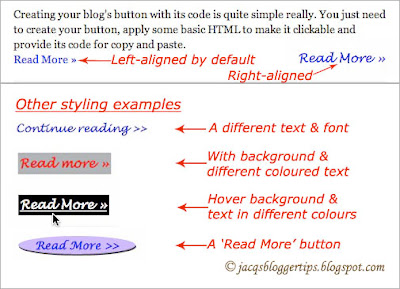
Hence, I'm happy to share here some related tips for those seeking to learn how to customize and style the 'Read More' or Jump link in various ways as illustrated in the image below!
Next,
learn how-to customize and style the 'Read More' or 'Jump Link'
in these interesting ways -
A. Change the 'Read More »' default text :
B. Align the 'Read More' link to the right or center :
(by default, it's left-aligned)
C. Increase font-size and the font style of the 'Read More' link :.jump-link {text-align: right;}
(change the word, right to center if you want to center-align the text)
D. Add a background to the 'Jump Link' and change the text color :.jump-link {font-size: 110%; font-family: "lucida handwriting", cursive;}
(change the font size and family as desired)
(this will override the default style)
E. Add hover colours to the 'Jump Link' :.jump-link a {background: #b2b4b6; color: #ff0000; padding: 2px;}
(I've chosen a grey background and red text but you can change the colours to match your blog and increase the px value if desired)
(colours of the background and text changes when a reader mouseover the 'Read More' link)
Note: The image below gives an example of the CSS snippets that were added to customize and style the 'Read More' or Jump link as explained in sections B to E above..jump-link a:hover {background: #000000; color: #ffffff; padding: 2px;}
(this example has a black background and white text, you can change the colours and padding size as desired)
F. Add a 'Read More' linked image or button as an alternative to the plain text link :<data:post.jumpText/><img border="0" src="URL OF THE IMAGE" />
(where the URL OF THE IMAGE is the entire URL of your uploaded button image as stored by your photo hosting website, such as Blogger, Photobucket or Flickr)
It is My Simple Notes by Using HTML for Blogging or Blogger Users in order to better good looking content


