Google Books Widget

Want to share your library with friends,
family and even the rest of the world? If that's the case, you can use
my new Google Books Library Widget. Please take a look and experiment
with this new widget, and let me know what you think about it.


Google Books

In Google Books you can create your own Library. Take a look here
to see my small test library. As you can see, there are 2 books in this
library, and I have written a small review for each of them. Creating
your own Google Books Library is very easy. First of all, you need to
have a Google account. As a Blogger user, you probably have one. After
signing in on your Google account, select "more" from the menubar on the
Google main page. This opens a small pop-up menu, where you can select
"Books". This brings you to the Books-page, where you start creating
your Library by "Importing Books". You can easily add books to your
Library by entering a list of ISBN-numbers. Google will look up all
bookdata. After importing some books, return to the Library page (click
on "My Library" in the menubar), to see your Library Listing. Now you
can add comments, reviews, and a ranking (0-5 stars) to your books.
After setting up your Library, it is time to move on to creating the
Google Books Library Widget.

Creating the Widget
Creating the Widget is done in a few easy steps:
  1. Get the URL of your Google Books Library;
  2. Create a Widget with Yahoo Pipes;
  3. Add the Widget to your Blog.

It will take less than a minute to set it up.

1. Get your Google Books Library URL
Go
to your Google Books Library page. Select the contents from your
browser's address bar by right-clicking on it and selecting "copy" from
the popup menu.

2. Create the Widget with Yahoo Pipes
Go to my Google Books Library Pipe
by clinking on the link. In the entry-field, enter the URL by
right-clicking and pasting the URL you just copied. Click the "Run Pipe"
button. Your Library data are retrieved, and displayed as a list of
titles and descriptions.
If the output is as you expected, go on to the next step.

3. Add the Widget to your Blog
Now
click on "Get as a Badge". Badge is the Yahoo-word for Widgets. This
will bring up the Badge Configuration Window. In this window, click on
"Customize the size, type and settings of your Badge". In the
entry-field again paste your Google Books URL and click "Next". Now
select "Blogger" as the destination for your Badge. This brings you to
the familiar Blogger-screen, where you can select the Blog, and enter
the heading for the new Page Element. Click on "Add Widget", and
afterwards view your Blog.
READ MORE - Google Books Widget

Weather Report Widget

Widgetizing your Blog is the new thing to explore here on Beautiful Beta. Ramani shows how to add random Einstein quotes to your Blog. Phydeaux3 started all this showing Flickr Puppies, and even Hoctro
now shows a Flickr Zeitgeist widget. So it is time that Beautiful Beta
follows these fellows, with a useful Weather Forecast Widget. And
ofcourse a tutorial on how to create this widget on your own Blog and
make it easy-to-install for your readers.

You have to follow 3 easy steps:
  1. Create the widget
  2. Add it to your Blog
  3. Add an Install-button to your Blog


Step 1: Create the Widget

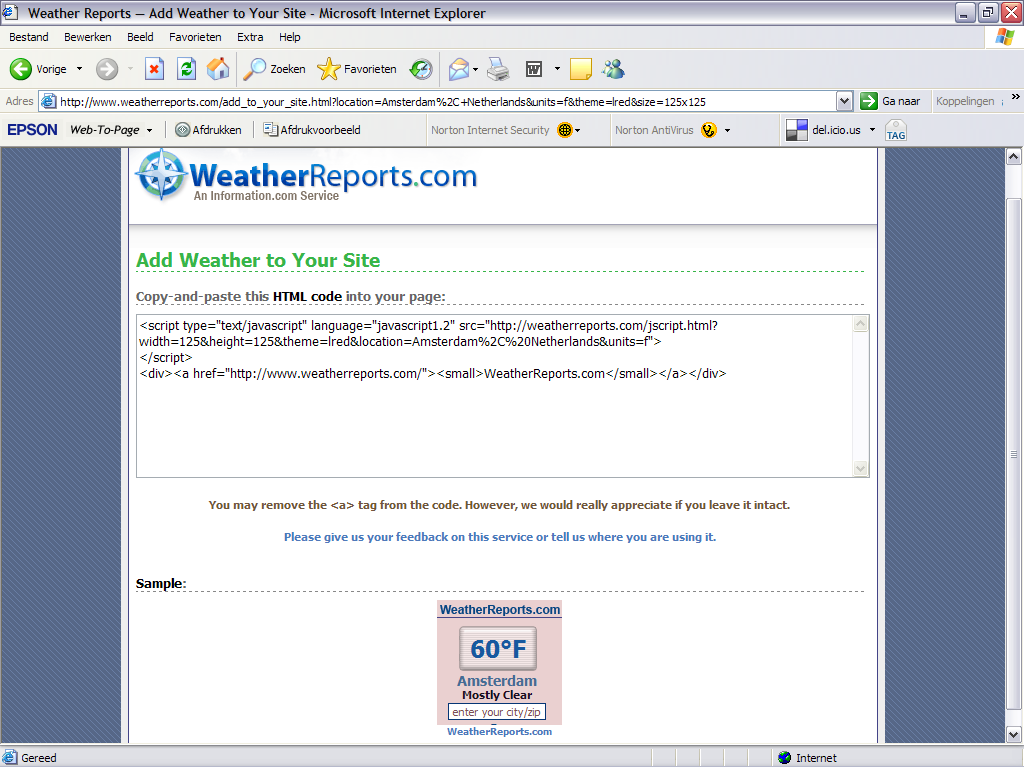
Go to WeatherReports.com, scroll down and click Add WeatherReports To Your Site.
In
the next screen, enter your city, select the colors and style of the
weatherbox. After entering all your selections, you will go to the next
screen automatically. Take a look at the preview, and select and copy
the HTML-code.


Step 2: Add the Widget to your Blog

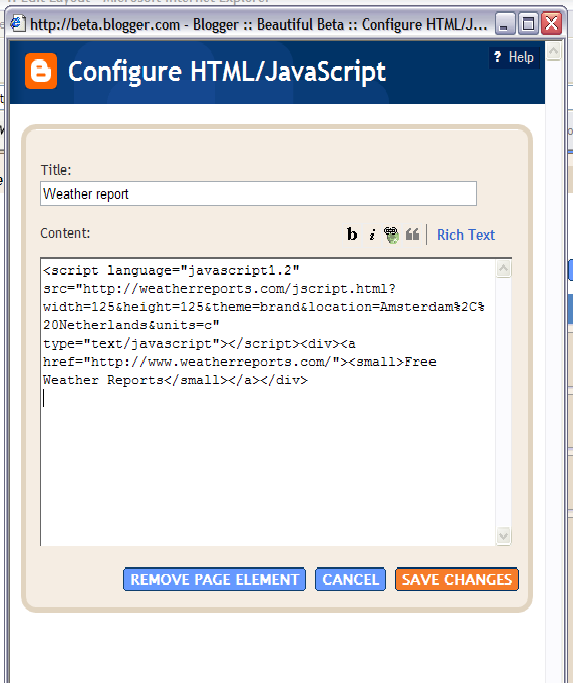
Add
an new HTML page element to the sidebar of your Blog. Paste the code
that you copied into the page element, and set its title to "Weather
Report".

Don't save it yet, but go to step 3.

Step 3: Add an Install-button

Now
we are going to add a button, that installs the widget on your visitors
blog when it is clicked. In fact, we'll add a form with several input
fields, but only the button will be visible. Here we go.

<form action="http://beta.blogger.com/add-widget" method="post">
<input value="Weather Report" name="widget.title" type="hidden"/>
<textarea style="display:none;" name="widget.content">

&lt;script
type="text/javascript" language="javascript1.2"
src="http://weatherreports.com/jscript.html?width=125&height=125&theme=brand&location=Amsterdam%2C%20Netherlands&units=c"&gt;</script>&lt;div><a
href="http://www.weatherreports.com/"&gt;<small&gt;Free
Weather Reports&lt;/small&gt;</a></div>
</textarea>
<input value="Install to Blog" name="go" type="submit"/>
</form>


The
text between the <textarea>-tags is the html of your widget.
Please notice that each < is replaced with &lt;, and that each
> is replaced with &gt;.

Now save the page element and view your Blog.

For an example look here.

If you want more information on how to add third-party widgets to your blog, take a look at these help pages.
READ MORE - Weather Report Widget

New Recent Comments Hack

Recent comments can be displayed in the
sidebar of your Blog using the Feed page element. As a Feed-url you can
provide "http://yourblogname/feeds/comments/full" to get the last 5
comments, with author and name. That's the standard functionality, and I
really didn't like it at all. The standard comments-feed has a few
things missing. First of all, the first few words of the comment are
displayed as a link, but clicking the link brings you to the top of the
post-item page in stead of to the comment itself. That is because of a
bug in the link that is provided by Blogger. Second, I want to see on
what post a person has commented. The feed doesn't provide for the post
title, but we could obtain it from the link - and that is where this
hack kicks in.

Our objective is to create a
Recent Comments widget, that displays recent comments in the following
format: "On [date & year] [author] commented on [post title]:
[comment-summary] (more)".

Here is how you do it.

Step 1: Make a backup of your template.

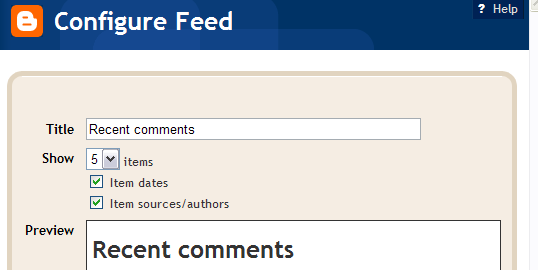
Step 2: Add a standard recent comments widget to your Blog.
From
the dashboard select your Blog and click Layout. Go to the Template tab
and select Page Elements. In your sidebar add a Feed page element.
Enter your comment feed url.


Tick Item dates and Item sources on.


Save your template and view your Blog. You now have a standard recent comments widget.

Step 3: Add some javascript to the head of your template.
If you added my social bookmarking hack, you can skip this step.
If
not, go to the Template tab, click Edit HTML, and add the following
line of code to your templates head, just above the </head>-tag:
<script src='http://home.planet.nl/~hansoosting/downloads/beautifulbeta.js' type='text/javascript'/>

Save the template.

Step 4: Replace the widget coding
Go
to the Template tab, and click Edit HTML. Now find your sidebar, and
look for the new widget you just created. It will look something like
this:

<b:widget id='Feed2' locked='false' title='Recent comments' type='Feed'/>

Now click Expand Widget Templates, and look for the widget. Use Ctrl-F to find it, using it's ID (in this example Feed2).
Replace the entire widget by the following code:

<b:widget id='Feed2' locked='false' title='Recent comments' type='Feed'>
<b:includable id='main'>
<h2><data:title/></h2>
<div class='widget-content'>
<ul expr:id='data:widget.instanceId + "_feedItemListDisplay"'>
<b:loop values='data:feedData.items' var='i'>
<li>
<b:if cond='data:showItemDate'>
<b:if cond='data:i.str_published != ""'>
<span class='item-date'>
On&#160;<data:i.str_published/>
</span>
</b:if>
</b:if>
<b:if cond='data:showItemAuthor'>
<b:if cond='data:i.author != ""'>
<span class='item-author'>
&#160;- <data:i.author/> commented on
</span>
</b:if>
</b:if>
<script type='text/javascript'>getPostTitle(&quot;<data:i.alternate.href/>&quot;)</script>&#160;:
<span class='item-title'>
<data:i.title/>&#160;<script

type='text/javascript'>getCommentLink(&quot;<data:i.alternate.href/>&quot;)</script>
</span>
</li>
</b:loop>
</ul>
<b:include name='quickedit'/>
</div>
</b:includable>
</b:widget>

Save your template.

Your hack is implemented now.

Tech stuff.
I
started with the standard-widget. First I canged the order of the
<data>-elements to date, author, comment-summary. The
comment-summary is represented by <data:i.title/>. In the standard
widget, the comment summary is embedded in an anchor that links (or
should link) to the comment. The consruction looks like this:

<a expr:href='data:i.alternate.href'><data:i.title/></a>

The
link-address of the <data:i.alternate.href/>-field has the
following format:
"http://yourblog.blogspot.com/year/month/posttitle.html#number".
We
will use this link to parse the posttitle from it, and to retrieve the
correct comment-permalink. The correct permalink to the comment has the
folowing format:
"http://yourblog.blogspot.com/year/month/posttitle.html#comment-number".

I
wrote 2 js functions. The first function, getPostTitle, is handed the
alternate.href, and writes the post title as a hyperlink to the
post-item-page to the document. The second function, getCommentLink, is
handed the alternate.href, builds the correct permalink, and displays it
as a (more)-link.
READ MORE - New Recent Comments Hack

Delving into JSON feeds

Developing my latest JSON-based widgets
was done with a lot of trial and error, without a good understanding of
the JSON-format and lacking knowledge of how to access the feed and
retrieve the data. So this weekend I did some research and developed a
small javascript program to analyze the feeds. It is tech stuff, so
don't worry if you don't understand it.

I found some documentation on the JSON-feed format, based on Google Calendar. A little later I discovered a simple tutorial on how to browse through JSON objects.

I
changed this into a recursive javascript function, that browses the
complete JSON-feed-tree, and displays all keys and all values. You can
use is to research any JSON-feed.

Create a simple HTML-page, using the following code.

<html>
<head>
<script type='text/javascript'>
function listkeys(feedobj,depth) {
for (key in feedobj) {
for (var i=0; i<depth; i++) document.write('- ');
document.write(key+' = '+feedobj[key]+'<br/>');
listkeys(feedobj[key],depth+1);}
}

function showfeedcontent(json) {
listkeys(json,0);
}</script>
</head>
<body>
JSON FEED PARSER
<br/><br/>
<script src="http://beautifulbeta.blogspot.com/feeds/posts/default?alt=json-in-
script&callback=showfeedcontent"></script>
</body>
</html>


In this code replace the beautifulbeta.blogspot.com feed reference to your own blog's feed.

Open the HTML-page in your browser, and the complete feed will be displayed.
READ MORE - Delving into JSON feeds

All Feeds by Feedburner

Your blog generates feeds, you have these links on your blog pages, but how many people have actually subscribed to your feeds?
Feedburner is used by many of you to monitor those statistics. But thanks to Ramani
I recently discovered that there is something like auto-detection, that
makes other feedreaders or browsers (like Firefox) automatically detect
and subscribe to feeds. Those subscribers are not monitored in the
Feedburner-count, so here is a tutorial on how to make all feeds
available by Feedburner only. It made my statistics jump from 35
subscribers to 70 in little more than a week.

Open your template in HTML-mode. Close to the top you will find this line of code:

<b:include data='blog' name='all-head-content'/>

This
line will not expand to the code behind it, even if you check the
Expand Widget Template box. Now view your blog, right-click on it, and
from the pop-up menu select "Source" (or the equivalent menu option from
your browser). This will bring up a Notepad window, with the HTML-code
of the displayed version of your blog. Look carefully at the top lines,
and you will see that the widget-code is replaced with:

<meta content='text/html; charset=UTF-8' http-equiv='Content-Type'/>
<meta content='true' name='MSSmartTagsPreventParsing'/>
<meta content='blogger' name='generator'/>
<link
rel="alternate" type="application/atom+xml" title="YourBlogName - Atom"
href="http://yourblog.blogspot.com/feeds/posts/default" />
<link
rel="alternate" type="application/rss+xml" title="YourBlogName - RSS"
href="http://yourblog.blogspot.com/feeds/posts/default?alt=rss" />

<link
rel="service.post" type="application/atom+xml" title="YourBlogName -
Atom" href="http://www.blogger.com/feeds/yourblogid/posts/default" />
<link rel="EditURI" type="application/rsd+xml" title="RSD" href="http://beta.blogger.com/rsd.g?blogID=yourblogid" />


In
this example, YourBlogName stands for the title of your blog,
yourblog.blogspot.com is your blog's url, and yourblogid is a long
number, the id of your blog. The two lines with link rel="alternate",
indicated in red, let newsreaders auto-detect your blogs feeds. So we
have to change these lines to point them in the direction of your
Feedburner feed. We'll do this in 2 easy steps.

Step 1: Make a backup of your template.

Open your template in HTML-mode, and download the template as a backup.

Step 2: Replace the widget code.

Remove the line:

<b:include data='blog' name='all-head-content'/>

Replace it with:

<meta content='text/html; charset=UTF-8' http-equiv='Content-Type'/>
<meta content='true' name='MSSmartTagsPreventParsing'/>
<meta content='blogger' name='generator'/>
<link href='http://feeds.feedburner.com/yourblogname' rel='alternate' title='RSS' type='application/atom+xml'/>
<link
rel="service.post" type="application/atom+xml" title="YourBlogName -
Atom" href="http://www.blogger.com/feeds/yourblogid/posts/default" />
<link rel="EditURI" type="application/rsd+xml" title="RSD" href="http://beta.blogger.com/rsd.g?blogID=yourblogid" />


Replace the http://feeds.feedburner.com/yourblogname with the url to your Feedburner feed.

Now save your template.

Now
that we have fixed the auto-detection part, there is still the issue of
the feed-link on your posts page. This feed-link has to be made
invisible, so that your visitor has no other option than following the
link to your Feedburner feed.
The standard feedlink provided by Blogger is of class .feed-link.

Open your template in HTML-mode, and inside the skin look for the following line:

.feed-link {

Below this line add:

display: none;

If there is no class .feed-link defined in your template, define it with:

.feed-link { display:none; }


Now save your template.

Congratulations! Your visitors have no escape from Feedburner!
READ MORE - All Feeds by Feedburner

Google Analytics

How do people find your blog? How do they
navigate around it? Which posts are hot, and which are not? That's
interesting to know, and that's why you could start using Google
Analytics, as I do.

Google Analytics is a
free tool, that gives you important and useful feedback on visitor
behavior on your blog. The only thing you have to do is add some
html/javascript code to your blog template, and set up your Google
Analytics account, wait a few days, and watch the data roll in.

Start by setting up an account at Google Analytics.
As a Blogger user you already have a Google account, and you use the
same username and password to set up your Analytics account.
These steps are easy to follow, and will be done in just a few minutes.

Without any further setting-up, this easy setup will provide you already with interesting data. Let me show you some.

This picture shows part of the Google Analytics Desktop.

Top
left you see a graph that show the number of visitors to your blog, the
number of page-views, and as a result the average number of page-views
per visitor.
Top-right you can see that more than 40% of my visitor
are regular ones. Bottom-right you can see where visitors come from. A
lot of them seem to find my blog by means of google, but as you can see
about 10% comes from Annie's Blogger University and from Ramani at Hackosphere. And bottom-left you can see where my visitors come from. All over the world, but mostly Europe, Asia and the US of A.

Now let's take a better look at sources and keywords on how people find my blog.

As
you can see, google is by far the most important source for leading
people to my blog. Ramani is a very good source to my blog: you can see
that 227 visitors found Beautiful Beta through Hackosphere. And that
number has gone up with 2% since the last period. The top 5 keywords
that are used by people point out that most of them are looking for
templates. This makes me realize that my blog's home page has no visible
link to a templates page. You really have to scroll down to the labels
widget, click 'templates', and then you can view 3 posts that have links
to templates. So that is obviously a point to improve.
What D1 and D2 mean will be dealt with later.

Now let's take a look into the popularity of my content:

As
you can see my home page receives the most hits, which is to be
expected. Most popular posts are the Widget Installation and Downloads
page and the new Blogger Beta Template page. So it would be a good idea
to link to these posts from my sidebar. The information behind these
simple screens is vast. Did you know that over 30% from the people who
visited my downloadspage come from USA and Canada?


In a next tutorial I will tell more about defining Destination pages, setting up Conversion Funnels, and measuring Goals.
READ MORE - Google Analytics