Syntax
highlighter are generally used for those blogs, which have scripting
tutorials. There are large number of powerful syntax highlighter tool
exist over the Internet (Add syntax highlighter with jQuery).
Through which you can make your code more readable to the user. It not
only highlight the script but also gives the clear idea, how the script
is formulated. But the main disadvantage in using them are they effect
the page loading time as they uses powerful jQuery script. So in this
tutorial I will tell you to add Syntax highlighter without any jQuery
script.
Finally I want to say that I give my best to produce this article if any
one find difficulty in doing this process then comment are always open
for that or if you like the above article then don't forget to subscribe
it for latest updates.
More Article From The Same Author
highlighter are generally used for those blogs, which have scripting
tutorials. There are large number of powerful syntax highlighter tool
exist over the Internet (Add syntax highlighter with jQuery).
Through which you can make your code more readable to the user. It not
only highlight the script but also gives the clear idea, how the script
is formulated. But the main disadvantage in using them are they effect
the page loading time as they uses powerful jQuery script. So in this
tutorial I will tell you to add Syntax highlighter without any jQuery
script.
How to Add Syntax Highlighter To Blog:-
- Login to Blogger Dashboard.
- Go to Design / Edit HTML.
- Find following piece of code in blogger template.
]]></b:skin>
- Choose your favorite syntax highlighter code from the list below and paste it just above the ]]></b:skin>
- And save the template.
/* Code written on internetricks4u.blogspot.in */
#mypretag
{
-moz-border-radius: 0px 25px 0px 25px;
 white-space:pre-line;
 background-color: <span style="color: lime;">#e3e3e3</span>;
height: auto;
min-height: 100%;
padding: 15px 5px 15px;
white-space:pre-line;
 width: 100%;
}
/* Code written on internetricks4u.blogspot.in */
#mypretag
 {
-moz-border-radius: 30px 30px 30px 30px;
border-radius: 25px 25px 25px 25px;
 background-color:<span style="color: lime;"> #e3e3e3</span>;
  padding: 15px 5px 15px;
 white-space: pre-line;
-moz-border-radius: 25px 25px 25px 25px;
border-radius: 25px 25px 25px 25px;
  width: 100%;
height: auto;
min-height: 100%;
  }
/* Code written on internetricks4u.blogspot.in */
#mypretag  {
border-left: 8px solid <span style="color: blue;">#1C86EE</span>;
-moz-border-radius: 25px 25px 25px 25px;
-webkit-border-radius: 25px 25px 25px 25px;
-o-border-radius: 25px 25px 25px 25px;
 white-space: pre-line;
 background-color: <span style="color: lime;">#e3e3e3</span>;
padding: 15px 5px 15px;
width: 100%;
border-radius: 25px 25px 25px 25px;
height: auto;
 min-height: 100%;
}
/* Code written on internetricks4u.blogspot.in */
#mypretag  {
border-left: 8px solid <span style="color: blue;">#1C86EE</span>;
background-color: <span style="color: lime;">#e3e3e3</span>;
height: auto;
 min-height: 100%;
padding: 15px 5px 15px;
 white-space: pre-line;
  width: 100%;
}
/* Code written on internetricks4u.blogspot.in */
#mypretag {
color: white;
 border-left: 8px solid <span style="color: blue;">#e3e3e3</span>;
 white-space: pre-line;
background-color: <span style="color: lime;">#262626</span>;
height: auto;
 min-height: 100%;
padding: 15px 5px 15px;
 width: 100%;
}
/* Code written on internetricks4u.blogspot.in */
#mypretag {

color:black;
 border-left: 8px solid <span style="color: blue;">#8B0000</span>;
background-color: <span style="color: lime;">#EEE685</span>;
 height: auto;
 min-height: 100%;
padding: 15px 5px 15px;
 white-space: pre-line;
 width: 100%;
}
/* Code written on internetricks4u.blogspot.in */
#mypretag {
color:black;
border-left: 16px solid <span style="color: blue;">#FFFF00</span>;
white-space: pre-line;
height: auto;
min-height: 100%;
background-color:<span style="color: lime;">#c5c1aa</span>;
padding: 15px 5px 15px;
 width: 100%;
-moz-border-radius:30px;
border-radius:30px;
-o-border-radius:30px;
-webkit-border-radius:30px;
}
Note:Make The Following Modification:-
- To change background color simply change #262626 to any desired value.
- To change the border color simply change #fff000 to any desired value.
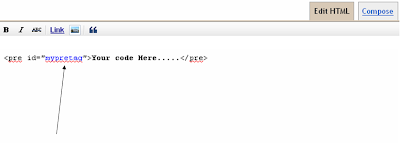
How To Use These Code:-
- Click Posting / New Post.
- Click "Edit HTML" in post editor of your post.
- And paste the following in it.
<pre id="<span style="color: blue;">mypretag</span>"><span style="color: red;">...Your Code Here...</span></pre>
- Good luck to your post.
Note:
The changes made by us will not shows up in compose tag whereas it shows when post will published.Finally I want to say that I give my best to produce this article if any
one find difficulty in doing this process then comment are always open
for that or if you like the above article then don't forget to subscribe
it for latest updates.
More Article From The Same Author

