Add Facebook Comment Box at Blogspot

Facebook comment box is one of the useful tool for bloggers to increase conversations. Recently Facebook has launched many social plugins for bloggers and web developers and one such is improved Facebook comment box. So here in this post I will teach you how to add/integrate Facebook comment box to blogger in simple steps. Before getting into the process I recommend you to back up your template and previous comments in blogger wont be visible if you use Facebook commenting system.

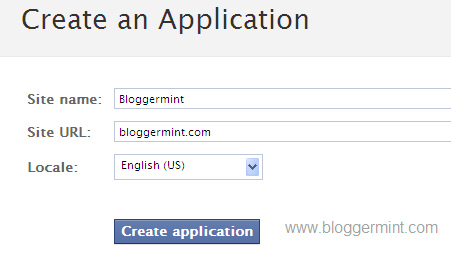
Step 1: Visit Facebook developer page and enter your blog name, URL and click on Create application.

Facebook comment system for blogger

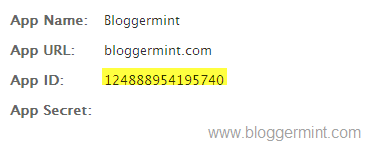
Now copy the App ID and save it in a notepad

Facebook comment box for blogger

Step 2: Login to you Blogger dashboard and navigate to Layout > Edit HTML and check on Expand Widget Templates. Search for the code <data:post.body/> or <div class=’post-header-line-1′/> and paste the code below <data:post.body/> or <div class=’post-header-line-1′/> and save the template.

01<b:if cond='data:blog.pageType == &quot;item&quot;'>
02  <p align='left'><img alt='' class='icon-action'src='https://blogger.googleusercontent.com/img/b/R29vZ2xl/AVvXsEhZ4MaT3q-19wICiXBX20oBgbbXEF8nFIo6qXiwyXxzdAxskiiscVNf2rF-Q3cW6_tbNbh1evYAZ7kRIB1GA-jd702wRF98eK3YIhsypqAgW4eOY5B1kvxluN6PFfSXLHOe9FxsNMgMuvn2/s1600/cmds.png'/></p>
03  <div id='fb-root'/>
04  <script>
05  window.fbAsyncInit = function() {
06  FB.init({appId: &#39;APPID&#39;, status: true, cookie: true,
07  xfbml: true});
08  };
09  (function() {
10  var e = document.createElement(&#39;script&#39;); e.async = true;
11  e.src = document.location.protocol  +
12  &#39;//connect.facebook.net/en_US/all.js&#39;;
13  e.async = true;
14  document.getElementById(&#39;fb-root&#39;).appendChild(e);
15  }());
16  </script>
17  <fb:comments/>
18  </b:if>

Change the APPID on the code with your APP ID provided from Facebook and save the template.

Step 3: Now you need to hide default blogger commenting system. So navigate to Settings > Comments and select hide and save settings.

Facebook comment box for Blogger

Live Demo

Note: Using Facebook Comments will hide your blogger comments. So use this comment box wisely.

READ MORE - Add Facebook Comment Box at Blogspot

Facebook Like Button on Post


Find this code at HTML

<div class='post-header-line-1'/>

add this code below that tag :

<div style='float:right;padding:4px;'>
<a expr:share_url='data:post.url' name='fb_share' rel='nofollow' type='box_count'/>
<script src='http://static.ak.fbcdn.net/connect.php/js/FB.Share' type='text/javascript'/>
</div>

Save deh..dan coba lihat hasilnya.
Kalo ada kegagalan, boleh kok tanya kemari. Atau minta bantuan saya untuk ngeditnya :)

Oia, edit seperlunya aja


READ MORE - Facebook Like Button on Post

Spoiler Code (just Like Forum)


Paste y<div><div style="margin-bottom: 2px;"><i><b>Here's: </b></i><input value="Show" style="margin: 0px; padding: 0px; width: 60px; font-size: 10px;" onclick="if (this.parentNode.parentNode.getElementsByTagName('div')[1].getElementsByTagName('div')[0].style.display != '') { this.parentNode.parentNode.getElementsByTagName('div')[1].getElementsByTagName('div')[0].style.display = ''; this.innerText = ''; this.value = 'Hide'; } else { this.parentNode.parentNode.getElementsByTagName('div')[1].getElementsByTagName('div')[0].style.display = 'none'; this.innerText = ''; this.value = 'Show'; }" type="button"/></div><div style="border: 1px inset ; margin: 0px; padding: 6px;"><div style="display: none;">Spoiler text here</div></div></div>our text here.

replace the necessary text for your own customization
or here's the simple one


<center><div style="border: 1px inset black; padding: 1px;"><div><button type="button" class="button" onclick="this.parentNode.parentNode.childNodes[1].style.display = ''; this.parentNode.style.display = 'none';" title="Click to show the spoiler."><span style="color:black;"><span style="color: rgb(255, 102, 0); font-weight: bold;">TITTLE</span></span></button></div><div id="spoiler" style="display: none;"><span style="font-weight: bold; color: rgb(255, 102, 0);">text or picture links or source here</span></div></div></center>


or


<div id="spoiler">

<input style="font-size: 11px; font-weight: bold; margin: 5px; padding: 0px;" onclick="if (this.parentNode.parentNode.getElementsByTagName('div')['show'].style.display != '') { this.parentNode.parentNode.getElementsByTagName('div')['show'].style.display = ''; this.parentNode.parentNode.getElementsByTagName('div')['hide'].style.display = 'none'; this.innerText = ''; this.value = 'TUTUP'; } else { this.parentNode.parentNode.getElementsByTagName('div')['show'].style.display = 'none'; this.parentNode.parentNode.getElementsByTagName('div')['hide'].style.display = ''; this.innerText = ''; this.value = 'LIHAT LAGI'; }" name="button" type="button" value="buka dunk" />&nbsp;
<div id="show" style="border: 1px solid white; display: none; margin: 5px; padding: 2px; width: 98%;">
<div style="color: #000000; background: none repeat scroll 0% 0% #ebf3fb; border: 1px solid #aaccee; padding: 7px; margin: 0px;">
<p style="text-align: justify;">this is text....</p>

</div>


READ MORE - Spoiler Code (just Like Forum)

Misc. Tools (online) for Blogging

Misc. Tools
MyBlogLog – Possibly the coolest blog community building tool around. Doubles as a simple analytics tool.
BlogRolling – Blogroll manager.
PollDaddy – cool polls for your blog.
BlogPolls – another provider of free polls for bloggers
Favicon Maker – simple service that enables you to easily create a favicon from an image.
Qumana – a desktop blog editor for Mac and Windows.
Blogjet – another desktop blog client, works only on Windows.
Blogarithm – enables you to track all your content at one place.
GeoLoc – a widget that shows your visitors’ locations on a world map.
JunkIWant – display your Amazon wishlist as a widget on your blog
BlogSticker – create stickers for your blog.
MyOpenId – enables you to identify yourself for various online service, using your blog address.
BlogFlux tools – several cool tools for bloggers.
ImageShack – free photo hosting service.
READ MORE - Misc. Tools (online) for Blogging

Add Sound Onclick or Onmouseover

One of the features of computer applications is that there is feedback when you do something. The most common type of feedback is sound. The computer clicks when you select things, beeps when there are errors, and makes other noises to alert you to situations. But Web pages don't usually have this type of feedback. But using DHTML attributes and sound, you can create a Web page that acts more like an application.

Add Sound Onclick or Onmouseover

This script will add sound effects to onclick and onmouseover attributes of elements. Be sure to test them in different browsers, as not all Web browsers handle onmouseover and onclick attributes on elements other than links.

Use JavaScript to Add Sound

Place the following script in the <head> of your HTML document:
 <script language="javascript" type="text/javascript">
 function playSound(soundfile) {
 document.getElementById("dummy").innerHTML=
 "<embed src=\""+soundfile+"\" hidden=\"true\" autostart=\"true\" loop=\"false\" />";
 }
 </script>

The Sound is Placed in an Empty Span

The JavaScript places an embed tag inside an empty span tag when the script is initiated. So, you need to add the following span file somewhere within the body of your HTML page, preferabl near the top of the document:
<span id="dummy"></span>

Call the Script with an onmouseover or onclick Attribute

The last thing you need to add is an element that you want to generate the sound on click or on mouseover. Call the script with one of those attributes:
<a href="#" onclick="playSound('URL to soundfile');">Click here to hear a sound</a>

 <p onmouseover="playSound('URL to soundfile');">Mouse over this text to hear a sound</p>
Play sound onclick example.
READ MORE - Add Sound Onclick or Onmouseover

Simple Tooltips with Span tags

It's pretty amazing what you can do with tooltip scripts - but it does depend on the script you use. Some are very complex and bulky and do require some Javascript knowledge. 
After testing half a dozen free scripts the one I've settled on and used for all the above examples is BoxOver. It's lightweight, cross-browser compatible and best of all, so simple to use. All you need to do is to download and import the .js script into your web; add a script path statement either in the <head> or <body> of your pages and then create your tooltips like so:

<span title="header=[h text] body=[b text]">T Text</span>

the result is :
T Text

The "h text" you replace with what you wish to appear in the header cell and "b text" should be replaced with the text you wish to appear in the cell beneath it. The "T Text" is the trigger item that will generate the tooltip popup - this can be just text or an image. You can also use HTML in "h text" and "b text"


<span title="ISN'T THIS SOOOOOO COOL!"><b>HOVER YOUR MOUSE HERE.</b></span>
the result is :

HOVER YOUR MOUSE HERE.


To add an alt tag to a text link would be like this;
<span><a href="index.html" title="this is so cool" target="_blank">Click Here For Hypergurl</a></span>

Click Here For Hypergurl
another advance example is :
<span onMouseOver="document.pic1.src='http://www.hypergurl.com/images/bluepic2.gif'" onMouseOut="document.pic1.src='http://www.hypergurl.com/images/bluepic1.gif'"><img src="bluepic1.gif" height="40" width="100" name="pic1"></SPAN>


and you can combine the code with these examples :
<span style="background-color: #FFFF00">You can highlight your text any color you like</span> 
for You can highlight your text any color you like

make it color customizable :
<span style="color: red; font-size: 14pt">You can add colored text</span>
;

You can add colored text

or adding background image
READ MORE - Simple Tooltips with Span tags