Comments Wall Gadget for Sidebar

Comments in Blogger are made under and on posts. The Main Page has a Comments link under each post for the viewer to click and post his/her comments. There is no facility to put in a general comment on anything under the sun! 

The Friend Connect Gadget provided a Comment Wall which you could put in the sidebar for inviting general comments. The Followers gadget is being upgraded to the Friend Connect gadget and hence it is now not possible to add the latter gadget in the usual manner. If you have Custom Domains then only you can add the Friend Connect gadget in the usual manner.

Here is a workaround to add the Comments Wall in the sidebar to a blogspot.com blog......................

1. INSTALL FOLLOWERS GADGET

If you do not have a Followers gadget in the blog the first step is to install it in the usual manner for adding gadgets to the blog. Login at Blogger.com and click Layout lik for your blog on Dashboard. On Page Elements subtab click Add Gadget link and in popup window click on Followers gadget. New blogs have this gadget by default.

2. GET SITE NUMBER FOR BLOG.

The next step is to get the site number for your blog. To get it Login at Blogger.com and click on View Blog link on Dashboard for blog. Blog will open in browser. Go to View---->Page Source from browser menu. In Page Source do a Ctrl+F (Edit--->Find) for 'site' in the Followers gadget. It will appear like this :

......
......
google.friendconnect.container.renderMembersGadget(
{ id: "div-1238464215135",
site: "BIG_NUMBER" },
skin);
</script>

Copy down the 'BIG_NUMBER' in the page source.

COMMENTS WALL CODE

In this step copy the code for the comment wall gadget given below :

<!-- Include the Google Friend Connect javascript library. -->
<script type="text/javascript" src="http://www.google.com/friendconnect/script/friendconnect.js"></script>
<!-- Define the div tag where the gadget will be inserted. -->
<div id="div-comment-wall" style="width:210px;border:1px solid #cccccc;"></div>
<!-- Render the gadget into a div. -->
<script type="text/javascript">
var skin = {};
skin['BORDER_COLOR'] = '#cccccc';
skin['ENDCAP_BG_COLOR'] = '#e0ecff';
skin['ENDCAP_TEXT_COLOR'] = '#333333';
skin['ENDCAP_LINK_COLOR'] = '#0000cc';
skin['ALTERNATE_BG_COLOR'] = '#ffffff';
skin['CONTENT_BG_COLOR'] = '#ffffff';
skin['CONTENT_LINK_COLOR'] = '#0000cc';
skin['CONTENT_TEXT_COLOR'] = '#333333';
skin['CONTENT_SECONDARY_LINK_COLOR'] = '#7777cc';
skin['CONTENT_SECONDARY_TEXT_COLOR'] = '#666666';
skin['CONTENT_HEADLINE_COLOR'] = '#333333';
skin['DEFAULT_COMMENT_TEXT'] = '- add your comment here -';
skin['HEADER_TEXT'] = 'Comments';
skin['POSTS_PER_PAGE'] = '5';
google.friendconnect.container.setParentUrl('/' /* location of rpc_relay.html and canvas.html */);
google.friendconnect.container.renderWallGadget(
{ id: 'div-comment-wall',
site: 'BIG_NUMBER',
'view-params':{"disableMinMax":"true","scope":"SITE","allowAnonymousPost":"true","features":"video,comment","startMaximized":"true"}
},
skin);
</script>

Put the site number from step 2 instead of 'BIG_NUMBER' in the code above. To customize it further change :

div id="div-comment-wall" style="width:210px;border:1px solid #cccccc;"></div>

width(210) in above code and border size(1px) and border color(cccccc). Change the colors by changing the hex numbers at the end of these lines :

skin['BORDER_COLOR'] = '#cccccc';
skin['ENDCAP_BG_COLOR'] = '#e0ecff';
skin['ENDCAP_TEXT_COLOR'] = '#333333';
skin['ENDCAP_LINK_COLOR'] = '#0000cc';
skin['ALTERNATE_BG_COLOR'] = '#ffffff';
skin['CONTENT_BG_COLOR'] = '#ffffff';
skin['CONTENT_LINK_COLOR'] = '#0000cc';
skin['CONTENT_TEXT_COLOR'] = '#333333';
skin['CONTENT_SECONDARY_LINK_COLOR'] = '#7777cc';
skin['CONTENT_SECONDARY_TEXT_COLOR'] = '#666666';
skin['CONTENT_HEADLINE_COLOR'] = '#333333';

You can get hex color numbers here.

To change number of comments shown change '5' (any number from 1 to 15) in this line :

skin['POSTS_PER_PAGE'] = '5';

To prevent spam delete :

"allowAnonymousPost":"true",

PASTE CODE IN HTML GADGET

Lastly copy the modified code and paste in a HTML gadget in sidebar. Login at Blogger.com and click Layout lik for your blog on Dashboard. On Page Elements subtab click Add Gadget link and in popup window click on HTML/Javascript gadget. In contents window paste the modified code and save. Here is what it looks like :


 

READ MORE - Comments Wall Gadget for Sidebar

Adding Powerpoint and Pdf file to Blogger Post

One method of putting Powerpoint presentations and Pdf files in your blog is by uploading them to a free host and putting the file links in your blog. This method does not allow you to actually display the files in your blog. Viewers can download the files and then view them on their PC.


Another method uses Google Presentations where you can create your presentations and show them on your blog in an iframe. This is not a very optimal method.


You can also convert Powerpoint presentations into Flash and then embed them in your blog post. 


Here is another easy method with which you can embed powerpint presentations, word documents, pdf files and audio files in your blog..................


EMBED POWERPOINT IN BLOG


Create your powerpoint presentation or have a file ready.

Create a free account at Scribd.com. Scribd is a site which lets you publish and share your files online. You can publish, convert, embed, analyze, and read documents using their custom Flash document viewer. Upload your file there and in the sidebar you will get the code under Embed. Copy and paste the code in Edit Html tab of post viewer. If you want to resize the presentation click the 'advanced' link to customize the height and width.

Read more: http://www.blogdoctor.me/2007/11/put-powerpoint-and-pdf-files-in-blog.html#ixzz1JrWAZF5U

READ MORE - Adding Powerpoint and Pdf file to Blogger Post

Google Maps with Markers in Blog

In a previous post we saw how to add a Google Map to blog. Sometimes having a simple map is not enough. Markers are used on a map to identify points on the map. See picture below (Click on picture to enlarge it):


In above picture you can see a Google Map with Markers in my test blog. Here are the steps to put such a map in your blog......................


STEP 1. Get a Google API key for your blog.

In the first step you have to generate a Google API key for your blog here.
Put a check in "I have read and agree with the terms and conditions (printable version)" box by clicking it. Paste your blogspot URL in the text box and click Generate API Key button. Copy down the key generated.


STEP 2. Modify the Template Code.


Login at Blogger.com

Click Layout link under Blog Title on Dashboard.

Click Edit HTML subtab of Layout tab.

Scroll down in Template Code box and change :

<body>

TO :

<body onload='initialize()' onunload='GUnload()'>

Save Template.


STEP 3. ADD HTML GADGET in sidebar.

Login at Blogger.com

Click Layout link on Dashboard under blog title.

Click Add Gadget link on Page Elements subtab of Layout tab.

In popup window scroll down and click HTML/Javascript Gadget.

Copy the code below and paste it in Contents window of the HTML gadget :


<script src="http://maps.google.com/maps?file=api&v=2&key=PASTE_YOUR_GOOGLE_API_KEY_HERE
type="text/javascript"></script>


<script type="text/javascript">

function initialize() {
if (GBrowserIsCompatible()) {
var map = new GMap2(document.getElementById("map_canvas"));
map.setCenter(new GLatLng(37.4419, -122.1419), 13);

// Add 10 markers to the map at random locations
var bounds = map.getBounds();
var southWest = bounds.getSouthWest();
var northEast = bounds.getNorthEast();
var lngSpan = northEast.lng() - southWest.lng();
var latSpan = northEast.lat() - southWest.lat();
for (var i = 0; i < 10; i++) {
var latlng = new GLatLng(southWest.lat() + latSpan * Math.random(),
southWest.lng() + lngSpan * Math.random());
map.addOverlay(new GMarker(latlng));
}
}
}

</script>

<div id="map_canvas" style="width: 500px; height: 300px"></div>


Customize the above code by :

1. Paste in the Google API key obtained in Step 1 where it says "PASTE_YOUR_GOOGLE_API_KEY_HERE".


2. Put in the latitude and longitude of your map center in this line :

map.setCenter(new GLatLng(37.4419, -122.1419), 13);

3. The above code will add 10 markers at random locations. For more information checkout the Google Maps documentation.


Save Gadget.


Read more: http://www.blogdoctor.me/2009/07/google-map-with-markers-in-blog.html#

READ MORE - Google Maps with Markers in Blog

Add a Google MAP to your Blog.

To add a Google Map to your blog go to ..........

http://www.google.com/apis/maps/ and click on the Sign up for a Google Maps API key button. It will take you to this page :
http://www.google.com/apis/maps/signup.html. This key identifies your web site to Google and helps them track usage of Google Maps. A new and distinct key is needed for each directory on your website that includes Google Maps.
Put a check in the box where it says I have read and agree with the terms and conditions and paste your blog url in the text box below and click on Generate API Key button.

Copy paste this code (ONLY THE BLUE LINES) just below the title tag in your template :

<script src='http://maps.google.com/maps?file=api&v=2&key=YOUR KEY' type='text/javascript'>
IN THE ABOVE LINE ADD amp; AFTER BOTH THE & CHARACTERS OR YOU WILL GET ERROR MESSAGE.
</script>
<script type="text/javascript">

//<![CDATA[

function load() {
if (GBrowserIsCompatible()) {
var map = new GMap2(document.getElementById("map"));
map.addControl(new GSmallMapControl());
map.setCenter(new GLatLng(37.4419, -122.1419), 5);
}
}

//]]>
</script>

Type in your Google API key code where it says 'YOUR KEY ' above.
Save Template. The addControl line adds a small pan and zoom control to the map. The next line centers and zooms the map to that latitude and longitude at zoom level 5.

Then paste this code inyour template just after <body> tag :

<body onload="load()" onunload="GUnload()">
<div id="map" style="width: 500px; height: 300px"></div>
</body>

Save Template.

Paste this code in the css part of your template :

#map {
float:right;
margin:10px 20px 10px 10px;
}

Save Template

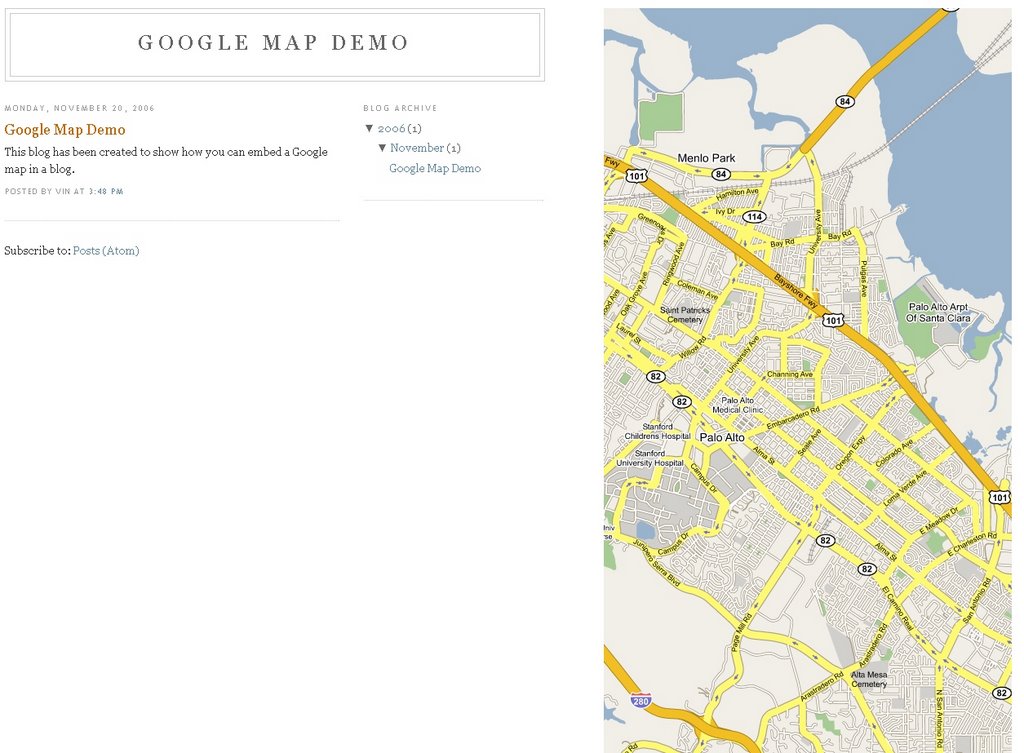
See how I have added it to my test site : http://googlemapdemo.blogspot.com/
Click on image below for larger view.

IMPORTANT : It is necessary to have an empty space in the right hand part of the body of your template to add this in the way I have done. I have used the Minima template and added a float left property to the outside wrapper to create room for the Google Map on the right side.


POST UPDATE

Google Maps Has now made it possible to easily add Maps to your blog. Go to http://maps.google.com/ and navigate to the location you wish to show. Click on 'Link to this Page' Link on the top right hand corner of the map. In the drop-down copy the EMBED code under 'Paste HTML to embed in website'. Login at Blogger.com and click on '+New Post' link on Dashboard. The Post Editor will open. Click on Edit Html tab and paste the EMBED code there and publish.
You can adjust the width and height in the code to fit your post.
For example :

View Larger Map

You can also paste the code in a Html Page Element in the sidebar.


Read more: http://www.blogdoctor.me/2006/11/add-google-map-to-your-blog.html#ixzz1JrSVZPzX

READ MORE - Add a Google MAP to your Blog.

Create Spoilers in Blog Posts with Javascripts


Spoilers are snippets of information which you may wish to hide from viewers. For example you are narrating a long tale about a murder and some viewers may wish to cut to the chase and find out who the real murderer is, while others would like to read the whole without having their enjoyment cut short suddenly by the revelation.


This is where you provide hidden text which is revealed with a click. To do this you need to make the following changes :


ADD JAVASCRIPT CODE


Copy and paste this Javascript code between </head> and ]]></b:skin> tags in your template on the Edit Html subtab of Template tab :

<script type="text/Javascript">

function togglecomments (postid) {

var whichpost = document.getElementById(postid);

if (whichpost.className=="commentshown") { whichpost.className="commenthidden"; } else { whichpost.className="commentshown"; }

} </script>

Save Template.


ADD CSS CODE


Then add the CSS code below :

.commenthidden {display:none;} 

.commentshown {display:inline;}

just above the ]]></b:skin> tag in the template and Save Template.


ADD CODE TO POST TEMPLATE


Add the following code to the post template in the Settings----->Formatting tab. Then the code will be available to you whenever you are creating a new post :

<a aiotitle="click to expand" href="javascript:togglecomments('NAMEITHERE')">

expand</a>

<div class="commenthidden" id="NAMEITHERE">
PUT HIDDEN TEXT HERE
</div>

Give it an unique name where it says NAMEITHERE and change "expand" to what ever you like. Type the hidden text inside the div (thats before the</div>). Save Settings.


For example :


Nam nunc. Donec blandit porta lacus. To see full text click here --->Nam dui tortorLorem ipsum dolor sit amet, consectetuer adipiscing elit. Pellentesque lobortis, turpis ut facilisis convallis, nulla sem feugiat tellus, in tempus mauris urna non lacus. Duis pellentesque. Cras tempor iaculis lacus. In pharetra elementum purus.

READ MORE - Create Spoilers in Blog Posts with Javascripts

My Notebook Template

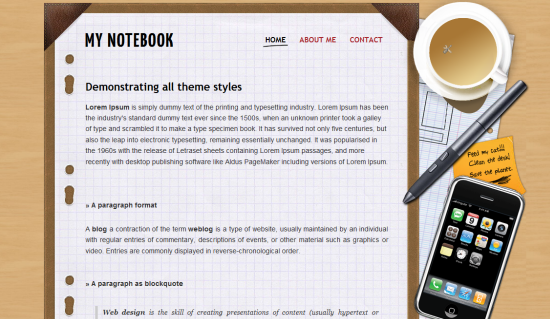
After a series of CSS based template, this time we have shift our focus to make a Blogger template that focus on design art. The original design of this template belongs toFreePSDfiles and we actually ported it, altered to make it work for the blogger platform. We love the template and hope you guys too love it.

If you guys want a custom Blogger or WordPress theme contact us. We are one of the best team who excel in blogger and WordPress themes.

my notebook blogger template

Template specifications:

  • Two column
  • Page navigation widget
  • Author widget
  • Compatible with all browsers

Do let us know, what you think about this template. Your suggestions will help us grow better.

READ MORE - My Notebook Template