


Good news everyone! Since Blogsolid launched in August, the number of RSS subscribers has steadily been growing. October has seen the subscribership pass the 200 mark. This is a humble achievement, but as we all know, growing your subscriber-base is important for any blog. Subscriber figures are an indication of how many (or few) loyal readers you have. An interesting observation is that as the subscriber count for Blogsolid has been growing, visits to the site have been on the decline. During the past week, visitor numbers have been lower than subscriber numbers every day – on some quieter days up to 50% less! So what has caused this shift? I believe that the answer lies in the fact that Blogsolid offers full feeds. Blogs usually offer RSS feeds in one of three different ways: Full feeds vs. partial feeds has long been a popular discussion among bloggers. A recent poll by ProBlogger reveals that the overwhelming majority of participating bloggers support full feeds, yet in reading comments it is interesting to note that some people claim to prefer partial feeds. Let’s take a quick look at some pros and cons of full feeds: Good The debate over full versus partial feeds rages on but my own findings having made the switch to full feeds here at ProBlogger is that my subscriber numbers went up significantly in the weeks after giving my readers my full posts. Bad As a designer, I have come to the conclusion that full feeds are the devil! Although content is king, I believe the design of a site is very important because it creates a visual context adding value to content. Content is robbed of the website’s context when read in a sterile black-on-white feedreader and so, runs the risk of losing value and impact. So, where to from here? Two possibilities come to mind: switch to partial feeds and regain site visitors or keep the full feeds and grow the subscriber base…
Each article appears in its entirety.
Only post titles appear. Sometimes these are accompanied by a short excerpt from the article.
Offer both and let your readers decide which feed they prefer.
Are Full Feeds Evil?

Five Benefits of FeedBurner
RSS is an essential technology for successful blogging. Since most of your regular readers will want to subscribe to your blog’s feed, it is a good idea to gain some knowledge about RSS and the value it offers. I assume your blog is equipped with at least one RSS feed, but do you use FeedBurner?
Owned by Google, FeedBurner is a free service offering tools to help you make the most of your feed. Here are five things I enjoy most about “burning” my feeds:

- Keep count of your subscribers
I found it a little difficult to understand FeedBurner’s stats at first, but basically the number of individual subscribers to your feed is determinedper day. Naturally, not everyone accesses their feedreaders daily, so the number of subscribers fluctuates. Over time, FeedBurner calculates the average number of people who access your feed daily
You are able to “burn” multiple feeds in one account on FeedBurner. - Change the location of your feed without losing your subscribers
I recently changed the URL of my RSS feed from http://blogsolid.com/ideas/feed to http://blogsolid.com/feed. My subscribers were none the wiser, since they are subscribed to the FeedBurner URL which remained constant athttp://feeds.feedburner.com/blogsolid. - Browser Friendly
Feedburner dresses up your raw XML and presents it in a neat, formatted and readable fashion. - Feed Image Burner
Of course, as a designer, this is my favourite feature – add your logo to the top of the feed! - Email Subscriptions
Offer your fans the opportunity to receive updates to your blog by e-mail. Once again FeedBurner allows you to dolly it up with your logo and choice of colours.
I actually didn’t see this service at first as it is a little hidden on the site. You have to click on “Publicize” at the top, then “Email Subscriptions” is located in the sidebar.
Oh, apart from the functionality, I really enjoy the random dry humour on the FeedBurner site. The copywriters must have had the time of their lives. “My Feeds do the boogie woogie”. What, they do? Haha.
Know any FeedBurner tricks and tips? Please share your feedburning wisdom in the comments below.
Viral Marketing for Beginners
Checking the del.icio.us popular page today, I noticed this page, which had already been tagged 923 times and rising. No knock against the person who wrote it but...it's just a list of a half-dozen or so AJAX tutorials. I mean, can viral marketing really be this easy? A killer, comprehensive resource like the SEOMoz Ranking Factors page gets 882 del.icio.us tags, and a links page listing seven AJAX tutorials eclipsed it easily in a few days (although SEOMoz's Web 2.0 awards had significantly wider appeal). And, of course, it's been Dugg. So what's the lesson here? I guess that getting Del.icio.us and Digg traffic by writing about AJAX is easier than your sister on prom night. I suppose the other lesson is get linked to by Scoble. Here's something that's both inspired by, and a commentary on, that post. It's a short list of the best viral marketing info I've come across online. First, a quick rundown on what makes an idea viral by the guy who essentially invented the term, Seth Godin. Second, Todd Malicoat (stuntdubl) has an excellent post on viral marketing from an SEO perspective(commonly referred to as linkbait). Third, Graywolf has some good ideas on how to get Dugg even if you're (gasp!) not writing about AJAX. From what I've heard, Digg traffic doesn't have much commercial value, since Digg users don't tend to buy anything, click on ads, or do anything else that might make you money. They arrive, read your stuff, and then move on (possibly knocking your site offline in the process if you weren't prepare for the influx of traffic). Tech-recipes breaks down what you should know about Digg traffic. Finally, CopyBlogger has a great free PDF ebook on viral marketing with blogs. With blogging, going viral doesn't necessarily mean big bucks. The financial benefit of going viral typically doesn't lie with selling to or otherwise monetizing the traffic itself, but rather with the increased exposure that might result in a large number of sites linking to you (especially bloggers). That boost in incoming links can then nicely translate into your site ranking higher for those keywords that actually will bring in paying customers.Viral Marketing for Beginners
The Beginners Guide to Promoting Your Site With Delicious.com
Social bookmarking sites like delicious.com are rapidly becoming important to search engine optimization, though for a slightly different reason than most people might suspect. Links from sites like delicious.com aren't worth a whole lot from a search engine perspective, since they use the "noarchive,nofollow,noindex" robots meta tag at the top of the bookmarks pages. However, these social bookmarking tools can be used to drive traffic to your site, if they're used correctly. The way to do that is to tag your pages with the keywords relevant to them. This especially can be used to increase the exposure of new blog posts. Let's say you have a blog about ringtones. After making a blog post, post it to your delicious account and tag it with keywords like "ringtones", "cellphone", and "mobile." A link and description will then show up on the following pages: http://delicious.com/tag/ringtones Each of those pages has its own rss feed, which is usually subscribed to by bloggers and other people interested in tracking the latest about those keywords. That means you increase the chances that those people are going to see the link to your site, a certain number are going to click through, and, if your post or article is a good one, some of them will probably link to you from their own sites.. Also, a link to your post will show up on this page (but only for two minutes): and if enough people find your page interesting enough to tag with their own delicious.com accounts, then it could show up on this page: Getting listed on the delicious.com "popular" page can potentially send you a huge amount of traffic, but getting there is not easy, since you have to be creating something that a large number of people will find tag-worthy. As you can see, the link-building effect of a site like delicious.com is indirect.The links from delicious.com confer no ranking benefit in themselves, but they can be used to send traffic to your site, and if you have something good to offer, a certain number of the people coming to your site are going to link to you. However, the traffic boost will be non-existent if the content is mediocre, and even good content will often be ignored if it doesn't catch on with a large group of people. While a site like delicious.com can be used to increase the exposure of your site, if you're going to be tagging your own pages, you should save it for those pages you find really exceptional. Otherwise, you're just increasing the clutter on the site, and boring pages are not likely to result in any increase in traffic or links.The Beginners Guide to Promoting Your Site With Delicious.com
http://delicious.com/tag/cellphone
http://delicious.com/tag/mobile
Hiding Image Alt Text
I recently co-authored a 3-part series on keyword strategy for Search Engine News. The last article covered keyword placement, and one of the places (though far down on the list) we recommended putting your keywords was in your image alt text. Most might scoff at the idea of keywords in image alt text effecting a page's search engine rank, but I can tell you definitively that I have seen pages which had almost no content rank highly for fairly competitive keywords based entirely on image alt text keywords. Stuff enough of them in there, and you're going to rank. One drawback to placing keywords in image alt text is that those keywords are visible to anyone who places their mouse over the image (actually, this is the case with IE, but not with Firefox, which shows the text in the title attribute). This isn't a big deal if you're just using a short descriptive phrase (the way alt text is intended to be used), but if you're packing that thing full of keywords, then it's going to look pretty weird. Shouldn't there be some easy way to hide image alt text from mouseovers? Actually, there is. All you need to do is add a blank title attribute to the image tag. It's as simple as that. For example, let's take the following cute public domain image approximation of the Linux penguin and stuff it with keywords related to this article: <img src="http://www.esoos.com/images/linux.png" alt="hide keywords in image alt text, etc..., etc..." style="float: left; padding-right: 4px;" height="128" width="107"> I could actually stuff a lot more keywords in here, but I don't actually want to engage in spam. Rather, I'm just showing you what can be done so you're aware of what to look out for, and conscious of the lines you can and cannot cross. Notice that if you mouse over the image in Internet Explorer, you can see the image alt text in a tooltip pop-up. Contrast that with the following image: <img src="http://www.esoos.com/images/linux.png" title="" alt="hide keywords in image alt text, etc..., etc..." style="float: left; padding-right: 4px;" height="128" width="107"> Alt tag with keywords is still there, but I've added the title="" attribute. This effectively suppresses the tooltip popup. Just be sure not to leave any space between the quotes, or you'll get a tiny little pop-up. Now that we've established that you can pack your alt text with keywords and keep it hidden from your users, the questions is: should you? And the answer would be: no, you really shouldn't. Granted it does work, but you're asking for trouble. Search engines catch you doing something like this and chances are good it's going to hurt your site. Most likely the search engines will never catch you on their own, but you can be sure that one of your competitors will be more than happy to file a spam report on you once you start to outrank them. Besides, it's really too easy to simply work your keywords into some visible text on your page, which is just as effective (actually more so), and you don't need to keep yourself up at night worrying if someone's going to turn you in. If you want some great advice on how to work your keywords into your site in a natural way, I recommend you either subscribe to Search Engine News or pick up Jill Whalen's Nitty-Gritty Guide to Writing for Search Engines. A bit of descriptive text in your image alt text is a good thing. But going overboard with keyword stuffing is risky. Still, now that you know how it works, you'll be able to spot it when you see it.Hiding Image Alt Text

About Avoiding Over SEO
The fight to top search engines' results knows no limits – neither ethical, nor technical. There are often reports of sites that have been temporarily or permanently excluded from Google and the other search engines because of malpractice and using “black hat” SEO optimization techniques. The reaction of search engines is easy to understand – with so many tricks and cheats that SEO experts include in their arsenal, the relevancy of returned results is seriously compromised to the point where search engines start to deliver completely irrelevant and manipulated search results. And even if search engines do not discover your scams right away, your competitors might report you. There are vis a vis to understand about it :
Keyword Density or Keyword Stuffing?
Doorway Pages and Hidden Text
Duplicate Content
Links Spam
SEO Traffic Generation Tips
SEO Traffic Generation Tips
SEO, or search engine optimization is the be-all-end-all of traffic generation. The two go hand in hand. This is because, in order to gain traffic to your site your articles, your advertisements and your website
must all be search engine optimized. So, when it comes to SEO, make sure you target everything and anything around this incredibly important concept.
Essentially, there are three basic elements to SEO- keywording, linking and content. Consider keywording, linking and content the three musketeers to successful SEO. To get you started, we’ve offered the top ten tips to SEO. Keep these in mind for all your copy and content to ensure the maximum traffic generation results.
- Choose good keywording phrases- instead of shaping words around articles, shape articles around words. Target your content around keywords or ideas. In order to find an angle for your article, consider using Google Adwords to see which keywords are most likely searched. Then, write an article around these key phrases and terms. This may seem like an odd concept, but as soon as your brain gets used to it, the writing will flow naturally.
- Use keywords throughout your website, marketing and advertisement- use keywords in your title, your subheadings and in your links. If you can, even use your keyword in your URL.
- Link away- it is okay to link to other sites. In fact, it’s a good idea, especially if these sites are highly respected and informative. Sites with .edu and .gov are often the best because they represent a highly regarded source.
- Link to your heart’s content- Links do not have to just be certain words. You can also make title links and anything else you want links. People are automatically drawn to links, so switch it up andmake your content stand out.
- Use your anchor text in links- Make sure your link text features your keyword phrase. Links stand out on websites and most people will click through, especially if your keyword phrase is directed towards their interest.
- Always add new content- are you constantly updating and adding new content to your website? Well you need to be to ensure SEO success! This cannot be stressed enough. Content is what will makeor break your site so make sure your content is entertaining, up to date and informative. For more content tips, check out the Article Marketing section.
- Be Bold- make use of Bold HTML tags and other HTML tags to make your website stand out. Bold is beautiful.
- Use Alt Imaging- a picture is worth a thousand words, especially on the net. Putting alt attributes on your images can allow you to place relevant text around your image, better for search engine indexing. Keep in mind that images are searched just as much as content is.
- Include a site map- a site map is a great way to navigate through your site and can also be submitted to Google with XML site map. Site maps help search engine robots find every page on your website in just two clicks. What this means is better search engine results for all your web pages. Make sure you link all pages properly for the best SEO results.
- Follow the rules- SEO has a set of particular rules. You need to understand the legality of SEO so you don’t get banned from search engines. So how do you do this? You research. You study. You learn. Take some time and go through the basics of SEO on the main search engines. Understanding the do’s and don’ts of SEO is critical when it comes to generating traffic. After all, you SEO strategy can either make, or break your website.
Basic Readmore Post
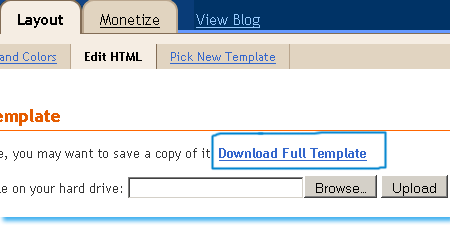
From this post The steps that must be followed for planting this TNT are, Now The Most Important Step –> Back Up Your Template By backing up your template I mean that you must save a copy of your current template in your computer hard drive. If in case something goes wrong, you can restore your template and have everything working as normal as before. To backup your template click on the link saying Download Full Template , as shown below If suppose something goes wrong , you will simply click the Browse button, locate your saved template and then simply click the Upload button to restore your template back to normal. Tip: Pressing Ctrl + F and then paste this code into the search box, as shown below, The search box is an easy way of finding codes in your template. Tip: Highlight the code below and then press Ctrl + c to copy the entire code and then press Ctrl + v to paste the code <style> And just after <data:post.body/> add the code below, <!--READ-MORE-STARTS--> <b:if cond='data:blog.pageType != "item"'> <div style="text-align: right;">Read More ->></div></a> <!--READ-MORE-STOPS--> You can replace the text in red with anything you like, e.g: Continue Reading, Keep Reading If you want to shift the "Read More->>" text to the extreme-left side, use this code: <!--READ-MORE-STARTS--> <b:if cond='data:blog.pageType != "item"'> <div style="text-align: left;">Read More ->></div></a> <!--READ-MORE-STOPS--> Read Further to know How to Apply this TNT in your Posts Now whenever you want to write a post in windows Live Writer, follow the procedure below, You will see something like this, <span class="fullpost"> </span> Now suppose if you want to show the post only till the lines I have explained everything in these images so read carefully! So you will add the codes as shown below, You can see in the image above that I have added <span class="fullpost"> just above the part of the post I wanted to hide. The text that I want to hide is the one below, “Please use windows live writer only for writing quality posts. This TNT of Read More link works best with windows Live writer. Blogger Editor is simply annoying and this trick simply just don’t work efficiently with it. If you still want to use blogger editor rather than windows live writer than frustration is what you will encounter! “ I added </span> to the part where the entire post completes or source code ends In short add <span class="fullpost"> just before the text to be hidden and add </span> just after it That’s All! You can use some of the Images below instead of that Read More –>> text To add an image instead of text simply replace Read More ->> in the code above with this, <img src=”URL Of Your Image”/> Replace URL Of Your Image with your image link.

<b:if cond='data:blog.pageType == "item"'>
span.fullpost {display:inline;}
<b:else/>
span.fullpost {display:none;}
</b:if>
</style>
<a expr:href='data:post.url'>
</b:if>
<a expr:href='data:post.url'>
</b:if>





Why My Meta Description Appears in All Search Results?

PS: If you don’t know what Meta Description is then kindly read these posts first,
How To Make Meta Description Appear Only on Homepages?
- Go To Blogger > Design > Edit HTML
- Backup Your Templates
- Search for your meta description which lies just at top portion of your HTML editor. Mine looks like,

4. Now simply enclose your meta Description between these codes,
<b:if cond='data:blog.url == data:blog.homepageUrl'>
Meta Description Goes here
</b:if>
5. Save your template and you are Done!