Add Post Slide Out to Blogger


  1. Login to your Blogger Dashboard.
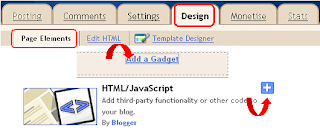
  2. Go to Design / Page Element.
  3. Click "Add a gadget" from sidebar.
  4. Choose HTML / JavaScript.
 blogger Design Edit HTML page element
  1. Paste the following code inside it.                           
<div><div id="bpslidein" style="display:none;">  <div class="help">?</div> <div class="expand">+</div> <div class="close">X</div> <p>Recommended for you</p> <div id="bpslidein_image"></div> <div  id="bpslidein_title">Loading..</div> </div> <script> if(document.location.href.split("/").length==6&&document.location. href.indexOf(".html")!=-1){if(typeof bp_onload_queue=='undefined') var bp_onload_queue=[];if(typeof bp_dom_loaded=='boolean')bp_dom_loaded =false;else var bp_dom_loaded=false;if(typeof bp_async_loader!='function') {function bp_async_loader(src,callback,id) {var script=document.createElement('script'); script.type="text/javascript" ;script.async=true;script.src=src;script.id=id; var previous_script=document.getElementById(id); if(previous_script)if(previous_script.readyS tate=="loaded"||previous_script.readyState=="complete") {callback();return}else{script=previous_script}if(script.onload!=null) previous_callback=script.onload;script.onload=script. onreadystatechange=function(){var newcallback; if(previous_script&&previous_callback)newcallback=function() {previous_callback();callback()};else newcallback=callback;if(bp_dom_loaded) {newcallback()}else bp_onload_queue.push(newcallback);script.onload=null; script.onreadystatechange=null}; var head=document.getElementsByTagName('head')[0];if(!previous_script )head.appendChild(script)}}if(typeof bp_domLoaded!='function') function bp_domLoaded(callback){bp_dom_loaded=true;var len=bp_onload_queue. length;for(var i=0;i<len;i++){bp_onload_queue[i]()}}bp_domLoaded(); bp_async_loader("http://ajax.googleapis.com/ajax/libs/jquery/1.7.1 /jquery.min.js",function(){bp_async_loader ("http://recommended-slide-out-for-blogger.googlecode.com /svn/trunk/bp-out-slide.min.js",function(){},"bp-out-slide")},"jQueryjs")} </script></div>
  1. Hit "Save" button.
  2. Now Go to Design / Edit HTML.
  3. Download the full template Before making any changes in it.
  4. Click "Expand Widget Template".
  5. Find ( CTRL+F) following piece of code in template.
<data:post.body/>
or
<div class='post-footer'> 
  1. Paste the following code just below it.
<span id="summary5487934719045884650"><pre class="code"><span id="summary5487934719045884650"><script>var bpslidein_custom_css=true;</script></span><b:if cond='data:blog.pageType == "item" '> <div style='display:none' id='bpslidein_place_holder'></div> </b:if>
  1. And Paste the following code just above the ]]>.
<span id="summary5487934719045884650"><pre class="code">#bpslidein{z-index:5;width:400px;height:100px;padding:10px;
background-color:<span style="color: magenta;">#fff</span>;
border-top:3px solid #1616F5;
position:fixed;right:-430px;bottom:0;
-moz-box-shadow:-2px 0 5px #aaa;-webkit-box-shadow:-2px 0 5px 
 
#aaa;box-shadow:-2px 0 5px 
#aaa;font-family:Arial, Helvetica, sans-serif;} #bpslidein p{font-size:11px;text-transform:uppercase;
font-family:Arial,Helvetica,sans-serif;letter-spacing:1px;color:#555;}
#bpslidein_title{color:<span style="color: lime;">#555;</span>font-weight:700;font-size:16px;
margin:10px 20px 10px 0;} #bpslidein a,#bpslidein 
a:hover,#bpslidein_title{text-decoration:none;color:#1616F5;} #bpslidein .close,#bpslidein .expand,#bpslidein .help
{border:2px solid #EEE;cursor:pointer;color:#9A9AA1;width:13px;
height:15px;padding:2px 0 0 5px;position:absolute;right:10px;
font-size:17px;font-weight:700;
font-family:Arial, Helvetica, sans-serif;font-size:12px;} #bpslidein .help{right:35px;} #bpslidein_title,#bpslidein_image{float:left;width:80px;} #bpslidein_title{width:290px;}
  1. Finally save the template and see the result.
 Note:-
  • If you find <data:post.body> or <div class='post-footer'> in more than one position then add the above code everywhere you find.
  • For changing the background color simply change background-color: #fff; to any desired value.     
  • Or you can change the title color by changing color:#555; to any desired value.
 I make its installation as easy as I can by adopting so much steps. So it is a time to apply this tricks on Blog.If you find any difficulty in doing this process then comments always open for that.
READ MORE - Add Post Slide Out to Blogger

Add Sharing Widget To Blog

You can
simply integrate this widget with your blog by adopting following
procedure. So lets see how to add this widget on the blog ?  

How to Add Sharing Widget To Blog:-

  1. Login to Blogger Dashboard.
  2. Go to Design /  Edit HTML.
  3. Click "Expand Widget Templates".
  4. Take Backup of your blog template, it is very necessary (More info). 
  5. Find following piece of code in blogger template.
<data:post.body/>
  1. Add
    the following code just below it. If you find <data:post.body/>
    code in more than one position then add the following code just below
    the <data:post.body/> on everywhere you find.
<!Widget on www.internetricks4u.blogspot.in --> 
<b:if cond='data:blog.pageType == &quot;item&quot;'>
<div style='border-top:1px solid #E0E0E0;width:100%;position:relative;margin-top:13px;'> </div>
<div style='margin-left:auto;margin-right:auto; width:600px;position:relative;'><div style='color:#FF3030;position:relative;top:12px;'><center>If you enjoyed this article then kindly take 5 seconds to share it!!</center></div>

<table align='center' cellpadding='8' cellspacing='1' id='myshare'>

<tr>

<td>

<a target="_blank" class='external' expr:href='&quot;http://www.facebook.com/share.php?u=&quot;+ data:post.url + &quot;&amp;title=&quot; + data:post.title' rel='nofollow' title='Share this on Facebook'><img src='https://blogger.googleusercontent.com/img/b/R29vZ2xl/AVvXsEgPtJ4hLjLMFf1qexEJ14OYRmSm-cWOzKPtdGpNnQKje6Hjngbve8L_H6WxROBXPAHOaTxQqyAdbNcD_Jb2-YR3QQXqyiULVvYqKn9tbfAwESa3Z94kf1Ue906T9cHAeUU6XnfDFkChoV0/h120/1.PNG'/></a></td>

<td>

<a target="_blank" class='external' expr:href='&quot;http://twitter.com/home?status=Reading: &quot; + data:blog.title + &quot; - &quot; + data:post.url + &quot; (@NAME)&quot;' rel='nofollow' title='Tweet This!'><img src='https://blogger.googleusercontent.com/img/b/R29vZ2xl/AVvXsEiZ9GHAdObg1M32rU1bkujkx8BPzPFW0gCYRQsDd6b9ZWN_VXjevt8gaY-kGhNPwBWOqZP0DERhL8yucEA2afH-b2ORhXPIFbJS9h6wOx9XULEpNiriNLC6OkWMbtQWPq-argoIdT4uS2U/h120/6.PNG'/></a></td>

<td>

<a target="_blank" class='external' expr:href='&quot;http://technorati.com/faves?add=&quot;+ data:post.url + &quot;&amp;title=&quot; + data:post.title' rel='nofollow' title='Share this on Technorati'><img src='https://blogger.googleusercontent.com/img/b/R29vZ2xl/AVvXsEhPlyWhbhPW3eQWME4JqdQOLDw3K2yMfiZdinqjY5aDTLje0PDuzEsXXxXMGm_0qDiSRQaIWvi7JXmtwphYQttsRmLiiPr-kw7FrdFfJuojJ40dgyZJuauO7UINHXwrW_cZ1MnociSbCJk/h120/5.PNG'/></a></td>

<td>

<a target="_blank" class='external' expr:href='&quot;http://del.icio.us/post?url=&quot;+ data:post.url + &quot;&amp;title=&quot; + data:post.title' rel='nofollow' title='Share this on del.icio.us'><img src='https://blogger.googleusercontent.com/img/b/R29vZ2xl/AVvXsEiib7_KGK2LITPNHaEGcuDFwnhzHGiBRGk-ZSrkDGEAuyRrPss4kUOTXuhd32lfutMpvICQKSKNb1yXunj0W6KLHs7HOFrgkHMcfFTbZnl8S65easB0WpHFfRULIiaRjMi5vJS2Qrnfctk/h120/3.PNG'/></a></td>

<td>

<a target="_blank" class='external' expr:href='&quot;http://digg.com/submit?phase=2&amp;url=&quot;+ data:post.url + &quot;&amp;title=&quot; + data:post.title' rel='nofollow' title='Digg this!'><img src='https://blogger.googleusercontent.com/img/b/R29vZ2xl/AVvXsEjMKBng6g2wbMPL8C6QIIdlQcB8jQDW_1ojzroviNNM9TG2RyhLBtnd1F01zWyWF8NhUWB79UZrh5JgqMvhEeATWCEZD0jITdWx3D7gDeCFp7j5fmkaM6bhMMRZa5kRyLis0i2Kynoi2bc/h120/2.PNG'/></a></td>

<td>

<a target="_blank" class='external' expr:href='&quot;http://www.linkedin.com/shareArticle?mini=true&amp;url=&quot;+ data:post.url + &quot;&amp;title=&quot; + data:post.title' rel='nofollow' title='Share this on Linkedin'><img src='https://blogger.googleusercontent.com/img/b/R29vZ2xl/AVvXsEhypvZHZRVmNQlpczTRDg0HfQmYGWII58j5aot1XI9Zd6UyDVZjHu8hCSlOxLwYzjlafEozZgjeM0OAok_RVbuJnShZJsa_eFTVsQtyWIC2oiAI449u-JOHDXHWHDqedggU6a4xX-6COuQ/h120/4.PNG'/></a></td>

<td><a target="_blank" class='external' expr:href='&quot;http://www.stumbleupon.com/submit?url=&quot;+ data:post.url + &quot;&amp;title=&quot; + data:post.title' rel='nofollow' title='Stumble upon something good? Share it on StumbleUpon'><img src='https://blogger.googleusercontent.com/img/b/R29vZ2xl/AVvXsEiOkW9zR7CzAnP_S4-7n3w_KPvmvRuCcsmsVMxqdJNYM4m-rLd9TTlZ045Pmy9kQaLqSVuqSqMdpeYHtAZao-7TH9oOYIY0RW7z5PjFpVwgMw9I-gqBsonIZRSDARVXYfSpOGPARiSspyE/h120/7.PNG'/></a></td>

</tr>

</table>

</div></b:if>
  1. Now search the following section in the template.
]]></b:skin>
  1. Add the following CSS code just above it.
#myshare

{width:100%px;

height:50px;

border:0px solid red;

position:relative;

}

#myshare tr td img

{width:50px;

height:50px;

position:relative;

}
  1. Finally save your template and see the result.
If anyone find difficulty in placing the above code then comments
are always open for that. If you like the above article then don't
forget to subscribe it for latest updates.
READ MORE - Add Sharing Widget To Blog

Improve Comment Box with Disqus

Disqus is a global community that improves the discussion on the
websites and connects people across the Internet. You can easily update
your Blogger comment box to Disqus. It makes commenting easier in your
blog and can be implemented into your blog very smoothly by following
steps.

                          1.Firstly,login to your Blogger Dashboard.

                          2.After that open Disqus in new window without closing the Blogger.

                          3.Click "Sign Up".

                          4.Fill all the details and click "Continue". 


                             5.Choose your Platform i.e blogger,wordpress.


                              6.At last click "ADD WIDGET".

source : http://internetricks4u.blogspot.in/2011/09/improve-comment-box-with-disqus.html
READ MORE - Improve Comment Box with Disqus

Add Meta Descripttion to Blogger Post


Blogger_meta_tag_seo

Blogger has now become more friendly with its new updated features. Blogger now finally introduced most awaited SEO
features for Google hosted blogspot blog. Blogger team is trying to get
closer to its biggest competitor Wordpress. Now you have no need to
hack template for adding meta tags.
You can easily add meta description, meta tag to not only for your Blog
homepage but also for individual posts or static pages. So lets see
learn the tutorial.


How to Add Meta Tag And Description:-


  1. Login to Blogger Dashboard.
  2. Go to Design /  Edit HTML.
  3. Download the full template before making any changes in it.( More Info
  4. Find following piece of code in blogger template.( say code 1)

<b:if cond='data:blog.metaDescription != &quot;&quot;'>
<meta expr:content='data:blog.metaDescription' name='description'/>
</b:if>

  1. If you find the above code then there is no modification needed in
    template but if you don't find this code then search for another code (
    say code 2).

<meta expr:content='data:blog.metaDescription' name='description'/>

  1. If you find code 2 then replace it with code 1 but if you don't find code 2 also then add code 1 just below the <head> section of template and save the template.


Add Meta Description To Blog:-


Go to Settings /  Search preferences, Under Meta tag /  Description, click "Edit" and select "Yes" , Now write a meta description about your blog in space provide.


blogger_meta_tag_path


Add Description To Your Post:-


While writing a new post in blogger post editor then you will find a
new option called "Search Description" under "Post Settings", where you
can add a short description of your individual post.


Blogger_meta_tag_post


Finally I want to say that if you find difficulty in adding meta
description then you can drop your comment below regarding your problem.

More article from the same author Improved
READ MORE - Add Meta Descripttion to Blogger Post

Pre Tag As Syntax Highlighter

syntax
Syntax
highlighter are generally used for those blogs, which have scripting
tutorials. There are large number of powerful syntax highlighter tool
exist over the Internet (Add syntax highlighter with jQuery).
Through which you can make your code more readable to the user. It not
only highlight the script but also gives the clear idea, how the script
is formulated. But the main disadvantage in using them are they effect
the page loading time as they uses powerful jQuery script. So in this
tutorial I will tell you to add Syntax highlighter without any jQuery
script.

How to Add Syntax Highlighter To Blog:-

  1. Login to Blogger Dashboard.
  2. Go to Design /  Edit HTML.
  3. Find following piece of code in blogger template.
]]></b:skin>
  1. Choose your favorite syntax highlighter code from the list below and paste it just above the ]]></b:skin> 
  2. And save the template.
/* Code written on internetricks4u.blogspot.in */
#mypretag
{
-moz-border-radius: 0px 25px 0px 25px;
white-space:pre-line;
background-color: <span style="color: lime;">#e3e3e3</span>;
height: auto;
min-height: 100%;
padding: 15px 5px 15px;
white-space:pre-line;
width: 100%;
}


/* Code written on internetricks4u.blogspot.in */
#mypretag
{
-moz-border-radius: 30px 30px 30px 30px;
border-radius: 25px 25px 25px 25px;
background-color:<span style="color: lime;"> #e3e3e3</span>;
padding: 15px 5px 15px;
white-space: pre-line;
-moz-border-radius: 25px 25px 25px 25px;
border-radius: 25px 25px 25px 25px;
width: 100%;
height: auto;
min-height: 100%;
}


/* Code written on internetricks4u.blogspot.in */
#mypretag  {
border-left: 8px solid <span style="color: blue;">#1C86EE</span>;
-moz-border-radius: 25px 25px 25px 25px;
-webkit-border-radius: 25px 25px 25px 25px;
-o-border-radius: 25px 25px 25px 25px;
white-space: pre-line;
background-color: <span style="color: lime;">#e3e3e3</span>;
padding: 15px 5px 15px;
width: 100%;
border-radius: 25px 25px 25px 25px;
height: auto;
min-height: 100%;
}


/* Code written on internetricks4u.blogspot.in */
#mypretag  {
border-left: 8px solid <span style="color: blue;">#1C86EE</span>;
background-color: <span style="color: lime;">#e3e3e3</span>;
height: auto;
min-height: 100%;
padding: 15px 5px 15px;
white-space: pre-line;
width: 100%;
}


/* Code written on internetricks4u.blogspot.in */
#mypretag { 
color: white;
border-left: 8px solid <span style="color: blue;">#e3e3e3</span>;
white-space: pre-line;
background-color: <span style="color: lime;">#262626</span>;
height: auto;
min-height: 100%;
padding: 15px 5px 15px;
width: 100%;
}


/* Code written on internetricks4u.blogspot.in */
#mypretag {  

color:black;
border-left: 8px solid <span style="color: blue;">#8B0000</span>;
background-color: <span style="color: lime;">#EEE685</span>;
height: auto;
min-height: 100%;
padding: 15px 5px 15px;
white-space: pre-line;
width: 100%;
}


/* Code written on internetricks4u.blogspot.in */
#mypretag {   
color:black;
border-left: 16px solid <span style="color: blue;">#FFFF00</span>;
white-space: pre-line;
height: auto;
min-height: 100%;
background-color:<span style="color: lime;">#c5c1aa</span>;
padding: 15px 5px 15px;
width: 100%;
-moz-border-radius:30px;
border-radius:30px;
-o-border-radius:30px;
-webkit-border-radius:30px;
}


Note:Make The Following Modification:-

  • To change background color simply change #262626 to any desired value.
  •  To change the border color simply change #fff000 to any desired value.

How To Use These Code:-

  1. Click Posting /  New Post.
  2. Click "Edit HTML" in post editor of your post.
  3. And paste the following in it.
<pre id="<span style="color: blue;">mypretag</span>"><span style="color: red;">...Your Code Here...</span></pre>
Pre tag syntax highlighter


  1. Good luck to your post.

Note:

The changes made by us will not shows up in compose tag whereas it shows when post will published.


Finally I want to say that I give my best to produce this article if any
one find difficulty in doing this process then comment are always open
for that or if you like the above article then don't forget to subscribe
it for latest updates.


More Article From The Same Author
READ MORE - Pre Tag As Syntax Highlighter

Make Over The 'pre' tags

Styling preformatted text blocks is one of the more difficult tasks
when customizing a blog. In truth, many bloggers may never need to use
preformatted text at all, but if you plan on posting code snipits, using
this technique is a must.


When you post large blocks of code on your blog you will probably be
using the <pre>,<code>, your code
</code>,</pre>, format. By doing so you are turning the code
block into monospaced type with the code tag, and wrapping the entire block in a command to maintain its preformatted state. This technique, in combination with a code snippet plugin like Code Autoescape will deliver a functional, though at times, unattractive result. How to style those pre tags?


When you keep the preformatting of a block of code, you are in effect
keeping all of the white-space and line-break formatting intact. This
means that, while your blog’s content area may be 500px across, if the
line of code runs to 800px your theme will likely break, or the code
will overlap your sidebar. This is absolutely devastating to the clean
lines and careful detail you have put into your blog’s custom look.


Many WordPress themes, in fact many website designs, use overflow-x:scroll;
to add a horizontal scroll bar to the preformatted text area. This, by
the way, is what I did on both the Slate and Paisley themes. It works
fine, and with made for release themes, I think it’s the best option.
That doesn’t mean that there aren’t any options to spiff up the look of
these snipits. Let’s take a look at some way to do it.


This is the stylesheet code from the Slate theme.


<code>pre {

height: auto;

overflow-x:scroll;

}</code>

With the pre tag styled in this way we get a preformatted text area that looks like this:

pre_tag-wordpress1


Let’s replace overflow-x:scroll; with some white-space and word-wrap values.


<code>pre {

height: auto;
white-space: pre-wrap;
white-space: -moz-pre-wrap;
white-space: -pre-wrap;
white-space: -o-pre-wrap;
word-wrap: break-word;

}</code>

The pre-wrap value and the variations included in this
stylesheet block specify that lines of code should break as necessary to
fit within the containing element. In addition, the word-wrap value break-word
specifies that, when necessary, unbreakable words may be broken so the
text will fit in the box. Now we have everything fitting within our
content area. Unfortunately, it looks a lot like the paragraph text:

pre_tag-wordpress-21


To fix this, let’s add a background color, padding, and change the
font around. With the Slate theme, we need to make a few changes to the
style sheet. We are going to add padding and a background to the pre tag like this:


<code>pre {

height: auto;
white-space: pre-wrap;
white-space: -moz-pre-wrap;
white-space: -pre-wrap;
white-space: -o-pre-wrap;
word-wrap: break-word;
padding:15px;
background: #459dcb;
}</code>

Additionally, let’s specify the code tag font when its wrapped in the pre tag:


<code>pre code{
font:16px Monaco, 'andale mono', 'lucida console', monospace;
color:#373737;
}</code>

Finally, we need to specify what our code tag font is, when it’s included in a paragraph:


<code>code{
font:14px Monaco, 'andale mono', 'lucida console', monospace;
}</code>

This is the final result:

pre_tag-wordpress-3


You might notice in the image that WordPress in the first line is wrapped with a code tag to show the code style when used in a paragraph.


Depending on the look you are going for, you might try stripping out
the background color all together and enlarging the font, or try messing
with the background color. There are endless possibilities.


source : http://www.arsgrafik.com/text-break-pre-tags/

READ MORE - Make Over The 'pre' tags